| Note |
|---|
Access to the Network tab requires a BSN.cloud account. |
The Network tab allows you to monitor players on your BSN.cloud network and modify them using the Remote DWS.
| Anchor | ||||
|---|---|---|---|---|
|
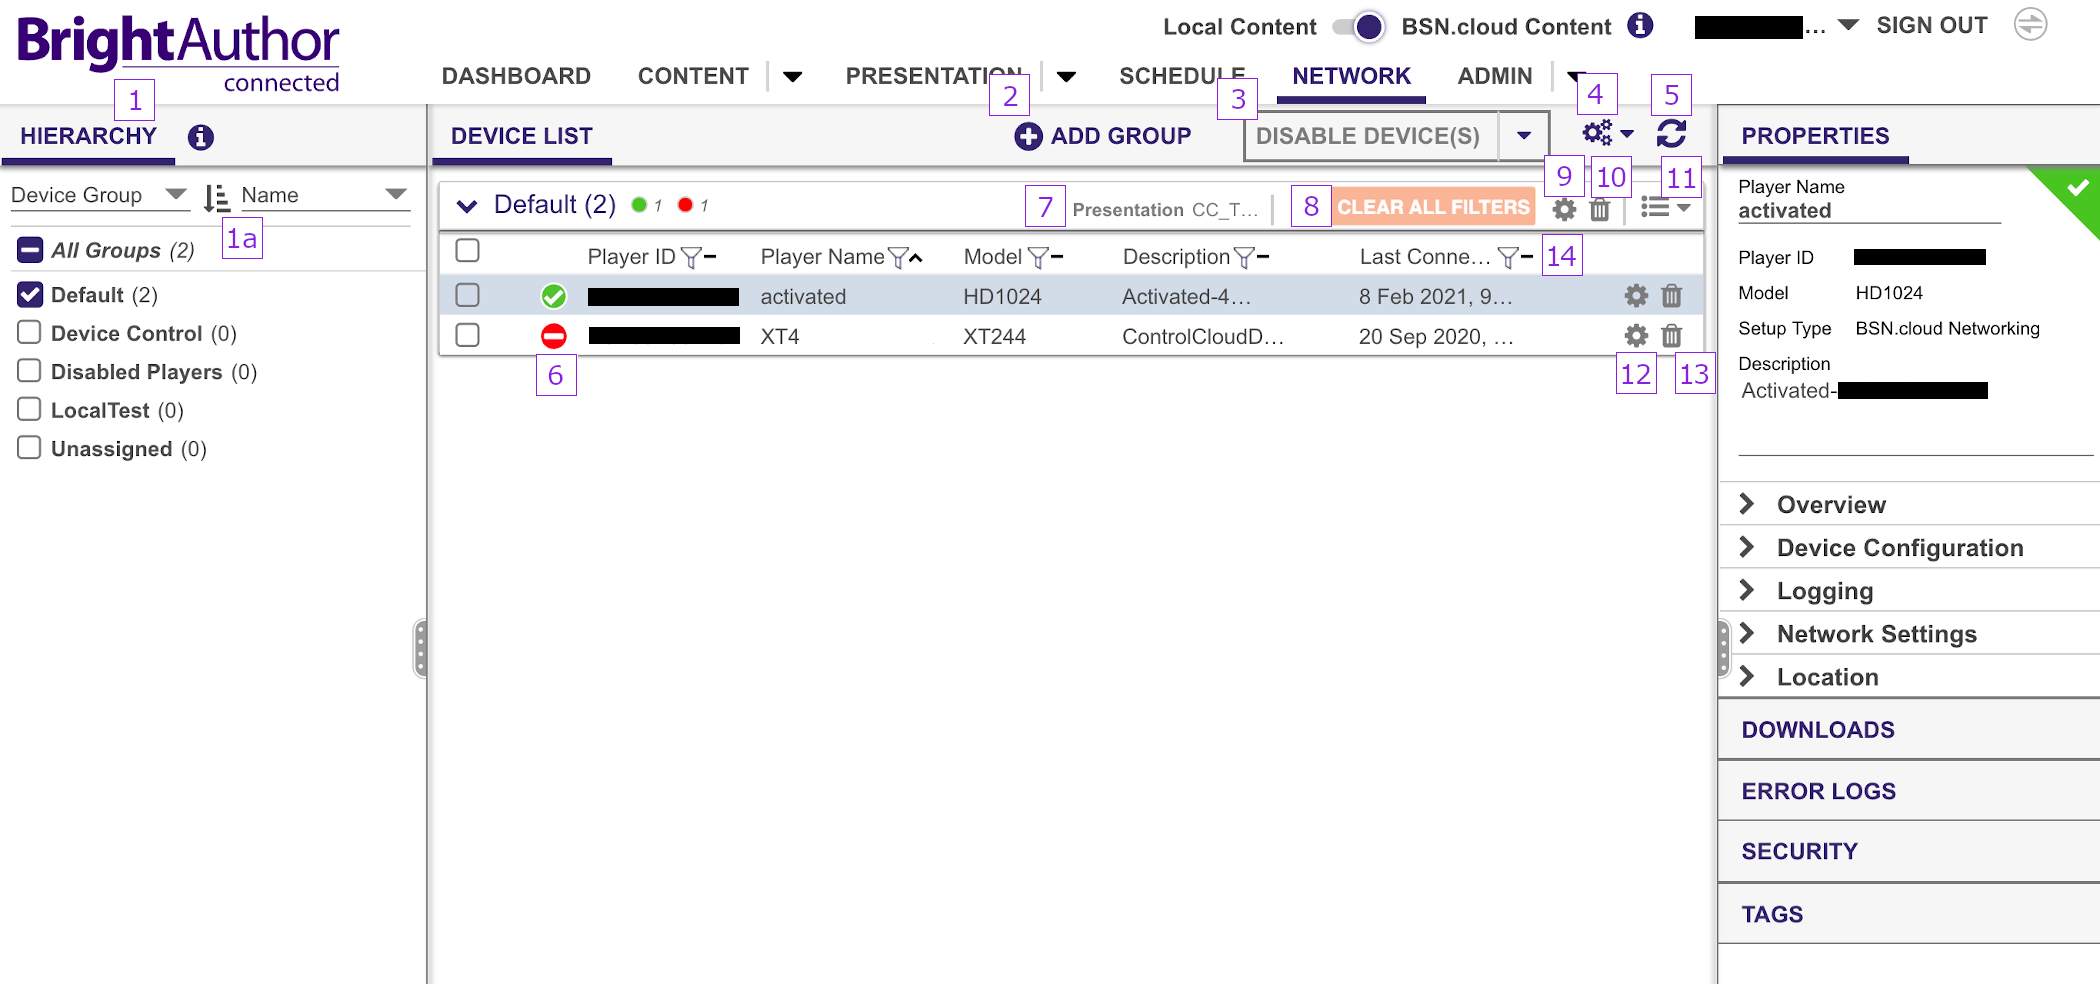
Image 1
| Panel | ||||||||||||
|---|---|---|---|---|---|---|---|---|---|---|---|---|
| ||||||||||||
ON THIS PAGE
|
1. Hierarchy: Use the dropdown menu to switch between viewing all players on your network (All Devices) and viewing players according to their BSN.cloud group (Device Group). Use the checkboxes to select which groups you wish to view. The ordering of the groups in the Device List depends on the order that the checkboxes were selected. Check the All Groups box to automatically view all players on your BSN.cloud network.
1a. Sort: Use the dropdown menu to switch between sorting by group Name and player Count. Use the  icon to toggle between ascending and descending order.
2. Add Group: Click the ![]() button to add a group to your BSN Content Cloud network. This option is only available when the Hierarchy option is set to Device Group.
button to add a group to your BSN Content Cloud network. This option is only available when the Hierarchy option is set to Device Group.
3. Delete Devices: Use this option to delete or disable players on your network (you must select one or more players in the Device List before using this option):
- Delete Device(s): Remove a player from your BSN.cloud network
- Disable Device(s): Move a player to the Disabled Players group. By default, this group is scheduled with the Disabled Players presentation, which displays a notice stating the player is disabled.
4. Customize Columns: Click the![]() icon to customize the player information columns in the Device List.
icon to customize the player information columns in the Device List.
5. Refresh: Click the  icon to refresh the contents of the Device List.
6. View Players: Click the.png?version=1&modificationDate=1562188294000&cacheVersion=1&api=v2) icon next to a group name to view players that are part of that group. Each player has a status icon, as shown at right. As of BrightAuthor:connected version 1.6.16, the following features are available:
icon next to a group name to view players that are part of that group. Each player has a status icon, as shown at right. As of BrightAuthor:connected version 1.6.16, the following features are available:
- To view only players with a certain status, select the color icon of the players you don't want to see next to each device group name (for example, the solid color icons next to All Devices (2) in Image 2, below). The icon will become grey and the player will disappear from the list. For example, if you want to see only healthy devices, select the yellow, red, and grey icons and then only players with the green/healthy status will be visible in the list. To revert, simply select the icons again and the hidden players will reappear.
- To order players by status, toggle the arrow at the top of the status list, as shown in Image 2, below.
- If the player ID is in red bold italic text, that player is missing or has an expired subscription. A new player that doesn’t have an available subscription would also display this way.
 Healthy: The player has checked in less than 5 minutes ago.
-
 Connection Lost: The player has not checked in for 5 to 15 minutes.
 -
 Inactive: The player has not checked in for 15 or more minutes. There can be several reasons for an inactive player; please see this FAQ for a full list of causes.
 -
 Disconnected: The player has no subscription, or its subscription has expired (BSN Content Cloud networks only).
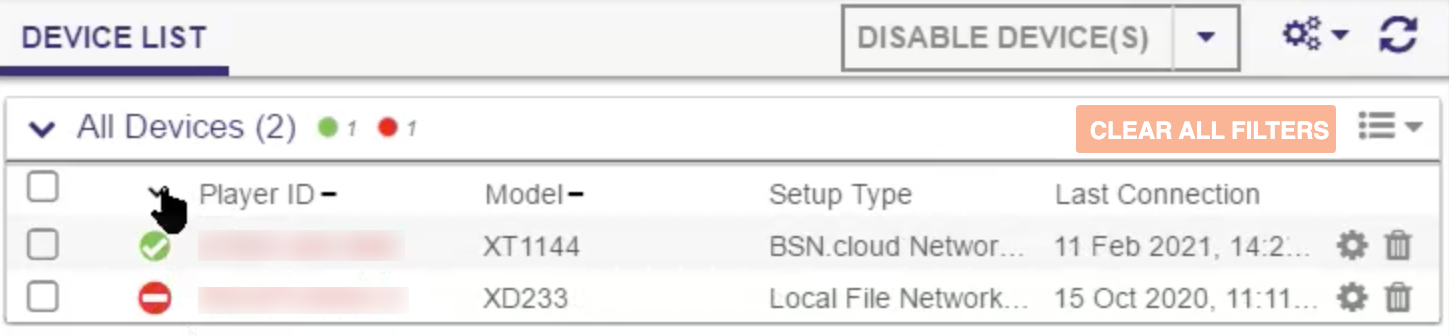
Image 2
7. Presentation : The currently scheduled presentation on the player (BSN Content Cloud networks only).
8. Clear all Filters: Clear any sort/filter parameters (see "14. Sort/Filter", below)
9. Group Properties: Click the  icon of a group to view its Group Properties.
10. Delete Group: Click the .png?version=2&modificationDate=1562191264000&cacheVersion=1&api=v2) icon of a group to delete it. Players set up with BSN.cloud that are part of the deleted group will be moved to the “Unassigned” group. Players set up with a non-BSN.cloud setup type that are part of the deleted group will be moved to the "Device Control" group.
icon of a group to delete it. Players set up with BSN.cloud that are part of the deleted group will be moved to the “Unassigned” group. Players set up with a non-BSN.cloud setup type that are part of the deleted group will be moved to the "Device Control" group.
11. Toggle Player View: Switch between viewing the players in a list and viewing players as part of a map.
12. View Remote DWS: Click the icon of a player to view its Remote DWS.
13. Delete Player: Click the icon of a player to delete it from your BSN.cloud network.
14. Sort/Filter: The dash/up/down arrow next to the category name lets you sort the items in the category, while the funnel icon lets you filter the category. For example, select the funnel icon and Apply to filter by Timestamp, as shown in Image 3, below.
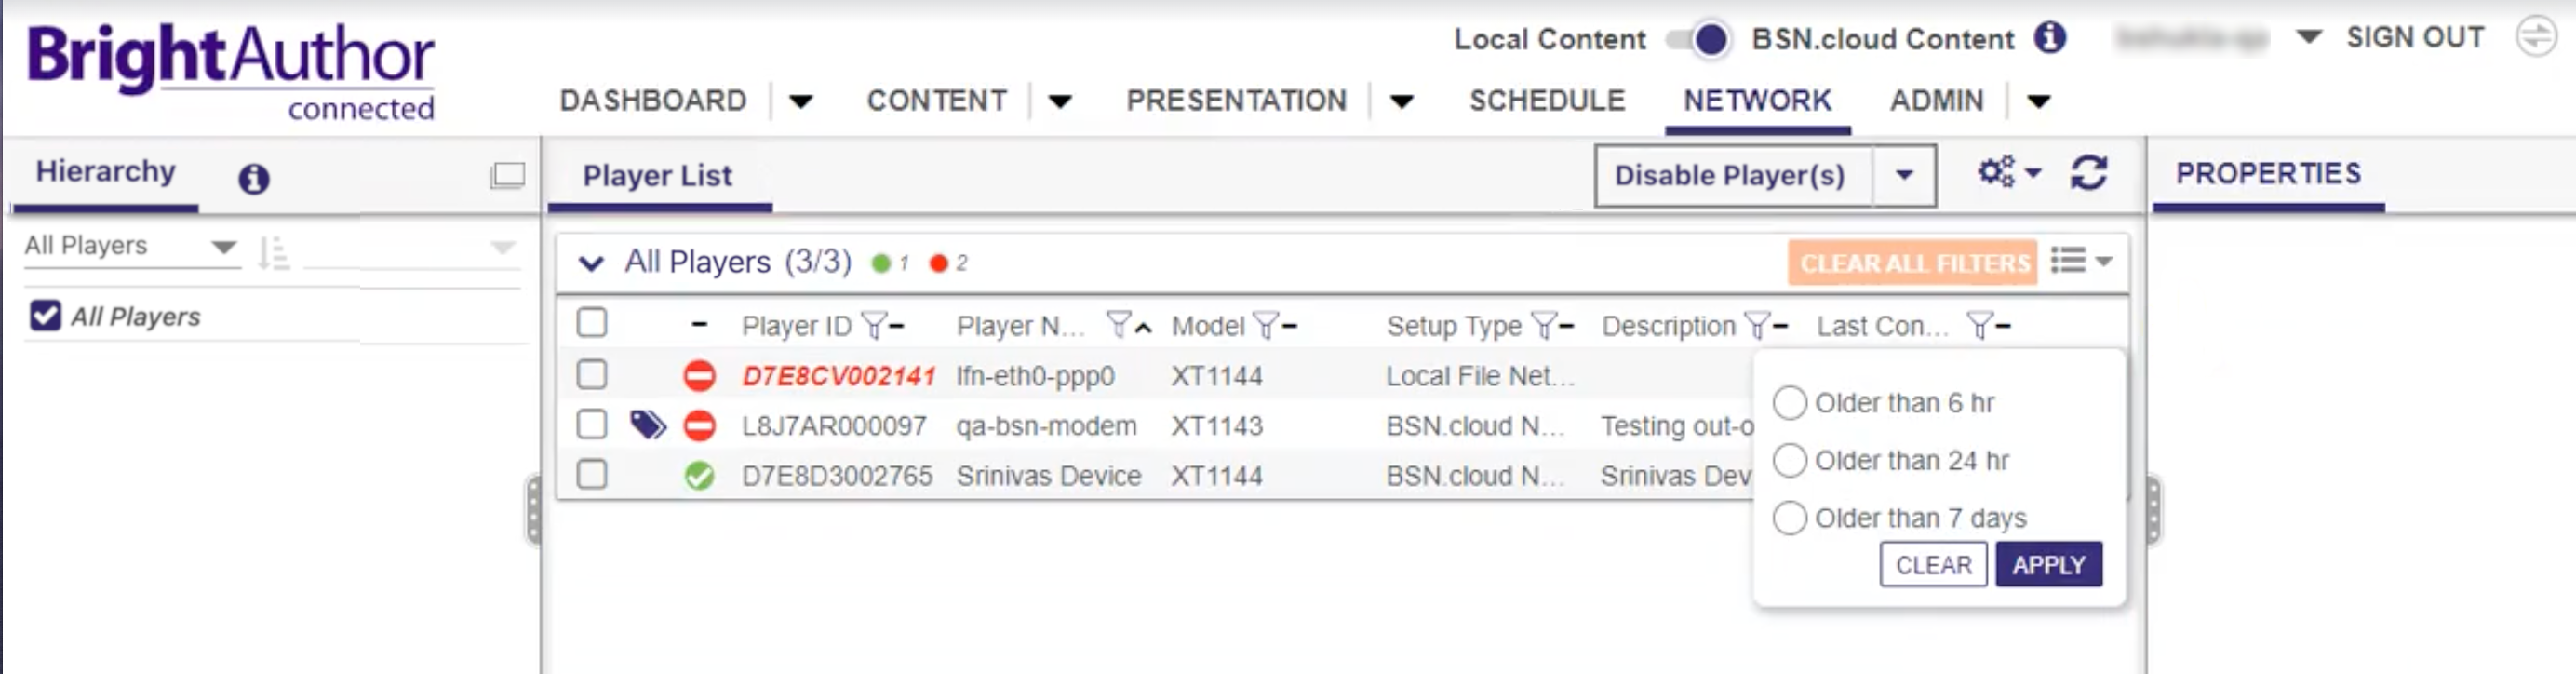
Image 3
Moving Players
To move a player between groups, drag and drop the player from its current group to the target new group.
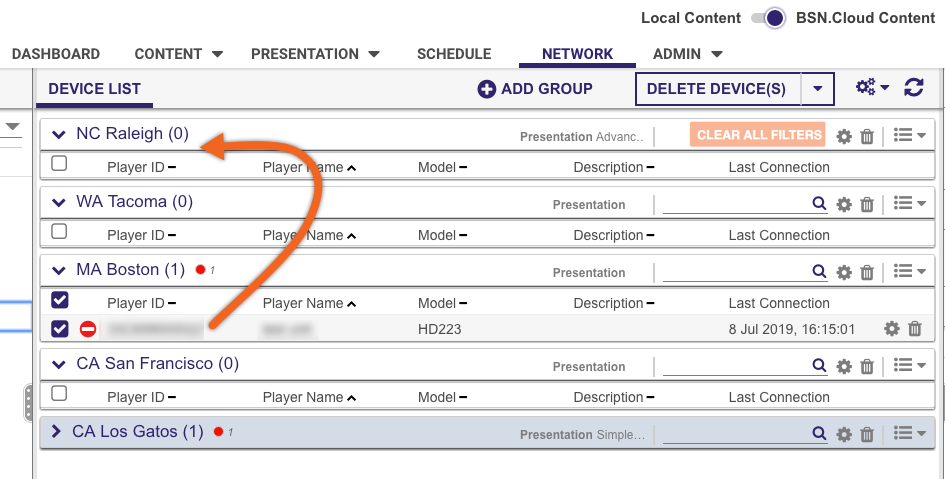
Image 4
Group Properties
| Anchor | ||||
|---|---|---|---|---|
|
Click the![]() icon of a group to view and edit its properties:
icon of a group to view and edit its properties:
- Group Name: The name of the BSN.cloud group
- Serial Debugging: Enable serial debugging for players in the group (BSN Content Cloud networks only). The autorun script will output debugging information related to the presentation to the serial port (as well as over Telnet and SSH if these features are enabled).
- System Log Debugging: Enable system-log debugging for players in the group (BSN Content Cloud networks only). The player will output system log information to the Log tab in the Diagnostic Web Server (or the serial/telnet/ssh ports if these are enabled via the Serial Debugging option).
- View Schedule: View and edit the schedule assigned to the BSN.cloud group.
Player Properties
| Note | ||||
|---|---|---|---|---|
| If Property Lock is off, the player Properties controls may be inaccessible for up to five minutes after the player presentation starts.||||
All player Properties controls will be disabled if Property Lock is on. In the Network tab under the Properties panel, Device Properties Disabled will be shown if the player is running a BrightSign OS that is less than 8.2.72 and is of the Standalone, Local File Networking, or Simple File Networking setup type. See Presentation Settings#PropertyLock for more information. |
Select a player to view and edit its properties:
- Player Name: The player name, which is designated during the player-setup process
- Player ID: The serial number of the player
- Model: The model number of the player
- Setup Type: The setup type of the player
- Description: The player description, which can be edited with the provided field
Overview
- Target Group: Change which group is assigned to the player
- Time Zone: Change the configured time zone on the player
- BrightSign OS Version: The current OS version installed on the player
- Autorun Version (Standard): The current autorun version of the BrightAuthor:connected presentation assigned to the player
- Remote Snapshot: Enable or disable Remote Snapshot on the player. You can view snapshots on the Remote DWS.
- Subscription Type: The type of BSN.cloud subscription assigned to the player
- Subscription Status: The current status of the BSN.cloud subscription assigned to the player
Device Configuration
- Enable Diagnostic Web Server: Enable or disable the local Diagnostic Web Server.
- Password: Specify a password for the local Diagnostic Web Server.
Logging
- Enable Playback Logging: Record playback start and end times, zone names, media types, and file names.
- Enable Event Logging: Record timestamps, state names, zone names, event types, and event data.
- Enable Diagnostic Logging:Record timestamps, firmware and script versions, and the current presentation.
- Enable State Logging: Record current and last state names, timestamps, and media types.
- Enable Variable Logging: Record the current and default values of all User Variables in the presentation.
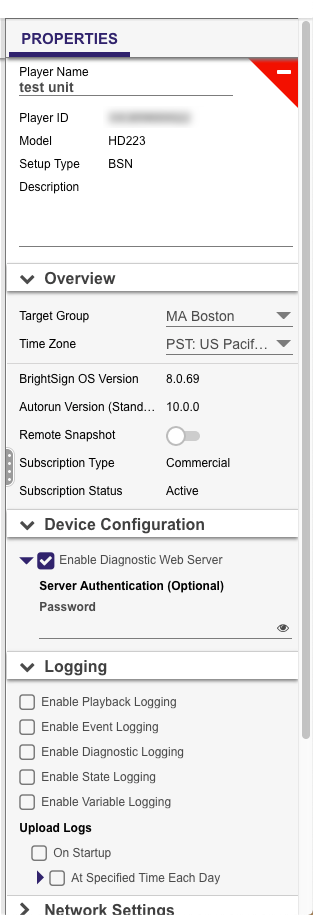
Image 5
Network Settings
Select Save to validate and apply the changes made in Network Settings or Reset to reset to the current settings.
- Interface Priority: Interactive settings that allow you to prioritize ethernet, WiFi, cellular, virtual, or other networks. The BrightSign player will always attempt to download and upload data for any particular data type using the first interface (at the top of the list) and will only use the next option if the first is unavailable, and so on to the bottom of the list.
- Data Types Enable: Use these checkboxes to determine the data types that can be transferred using the selected interface:
- Content (download videos, images, and audio)
- Text Feeds (download tickers and live text)
- Media Feeds (download media RSS, dynamic playlists)
- Health (upload the health status of the player)
- Log Uploads (upload logs)
- Connection Settings: Specify advanced settings for the wired and/or wireless connection. If DHCP Enabled is selected, the player will obtain its IP address using DHCP. Otherwise you will need to enter the required parameters in these fields:
- IP Address: Enter the player IP address
- Subnet Mask: Enter the subnet mask
- Default Gateway: Enter the default gateway
- DNS1: Enter an IPv4 or IPv6 address in CIDR notation
- DNS2: Enter an IPv4 or IPv6 address in CIDR notation (optional)
- DNS3: Enter an IPv4 or IPv6 address in CIDR notation (optional)
- Rate Limit Network Download Traffic: Set rate limitations for downloading content. You can also set rate limitations for During content download window (the "content download window" is specified during the Device Setup process) and During initial downloads.
- Outside Content Download Window
- Unlimited Download Rate: Sets no limit on downloads.
- Default limit: Sets the default limit (2000 Kbps) on downloads.
- Specify limit: Sets a customized limit. Enter a limit in the text field (in Kbps).
- During Content Download Window
- Unlimited Download Rate: Sets no limit on downloads.
- Default limit: Sets the default limit (2000 Kbps) on downloads.
- Specify limit: Sets a customized limit. Enter a limit in the text field (in Kbps).
- During Initial Downloads
- Unlimited Download Rate: Sets no limit on downloads.
- Default limit: Sets the default limit (2000 Kbps) on downloads.
- Specify limit: Sets a customized limit. Enter a limit in the text field (in Kbps).
- Outside Content Download Window
- Network Authentication: Use this section to configure the player for WPA Enterprise authentication.
- Enable 802.1X Authentication / Enable WPA Enterprise Authentication: Check this box to enable authentication via 802.1x (for wired) or WPA Enterprise Authentication (for wireless).
- Choose Network Authentication Variant: Choose one of the following:
- EAP-TLS: This authentication variant requires a client certificate and private key, which can be provided with one of the following certificate types:
- PKCS#12: The client certificate and private key are both provided in a single PKCS#12 formatted file (usually with a .p12 file extension). Click the first Browse button to locate the certificate file.
- X.509 PEM/DER: The client certificate is provided as a X.509 certificate (using PEM or DER encoding), and the key is encoded separately. Use the first Browse button to locate the X.509 certificate and the second Browse button to locate the PEM/DER key.
- PEAP/MSCHAPv2: This authentication variant requires a Username (i.e. identity) and Passphrase. For this method to work, the server must be configured to accept a username/password scheme instead of a client certificate.
- EAP-TLS: This authentication variant requires a client certificate and private key, which can be provided with one of the following certificate types:
Select Browse to add a CA Certificate: This should be the root CA certificate for the CA which signed the authentication server certificate. If omitted, the server certificate will not be validated.
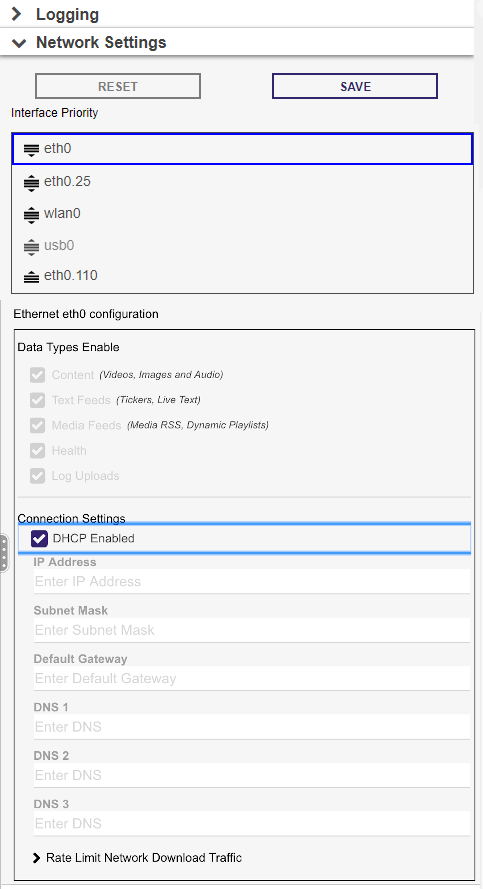
Image 6
Location
- GPS Coordinates: Specify the location of the player as a set of Latitude and Longitude coordinates.
- Address: Specify the location of the player using its City, State / Prov., and Country.
| Note | ||
|---|---|---|
| ||
Cell modem locations may not be accurate due to issues with the processing of cell tower information. |
Downloads
The Downloads section allows you to monitor the player synchronization process. Here you can view the progress of individual file transfers.
Click the ![]() Refresh button to update the status of the file transfers.
Refresh button to update the status of the file transfers.
Error Logs
The Error Logs section provides detailed information about the last five reported errors. If the player is operating normally, the error list will be blank.
Click the ![]() Refresh button to update the error list.
Refresh button to update the error list.