| Panel | ||||||||||||
|---|---|---|---|---|---|---|---|---|---|---|---|---|
| ||||||||||||
ON THIS PAGE
|
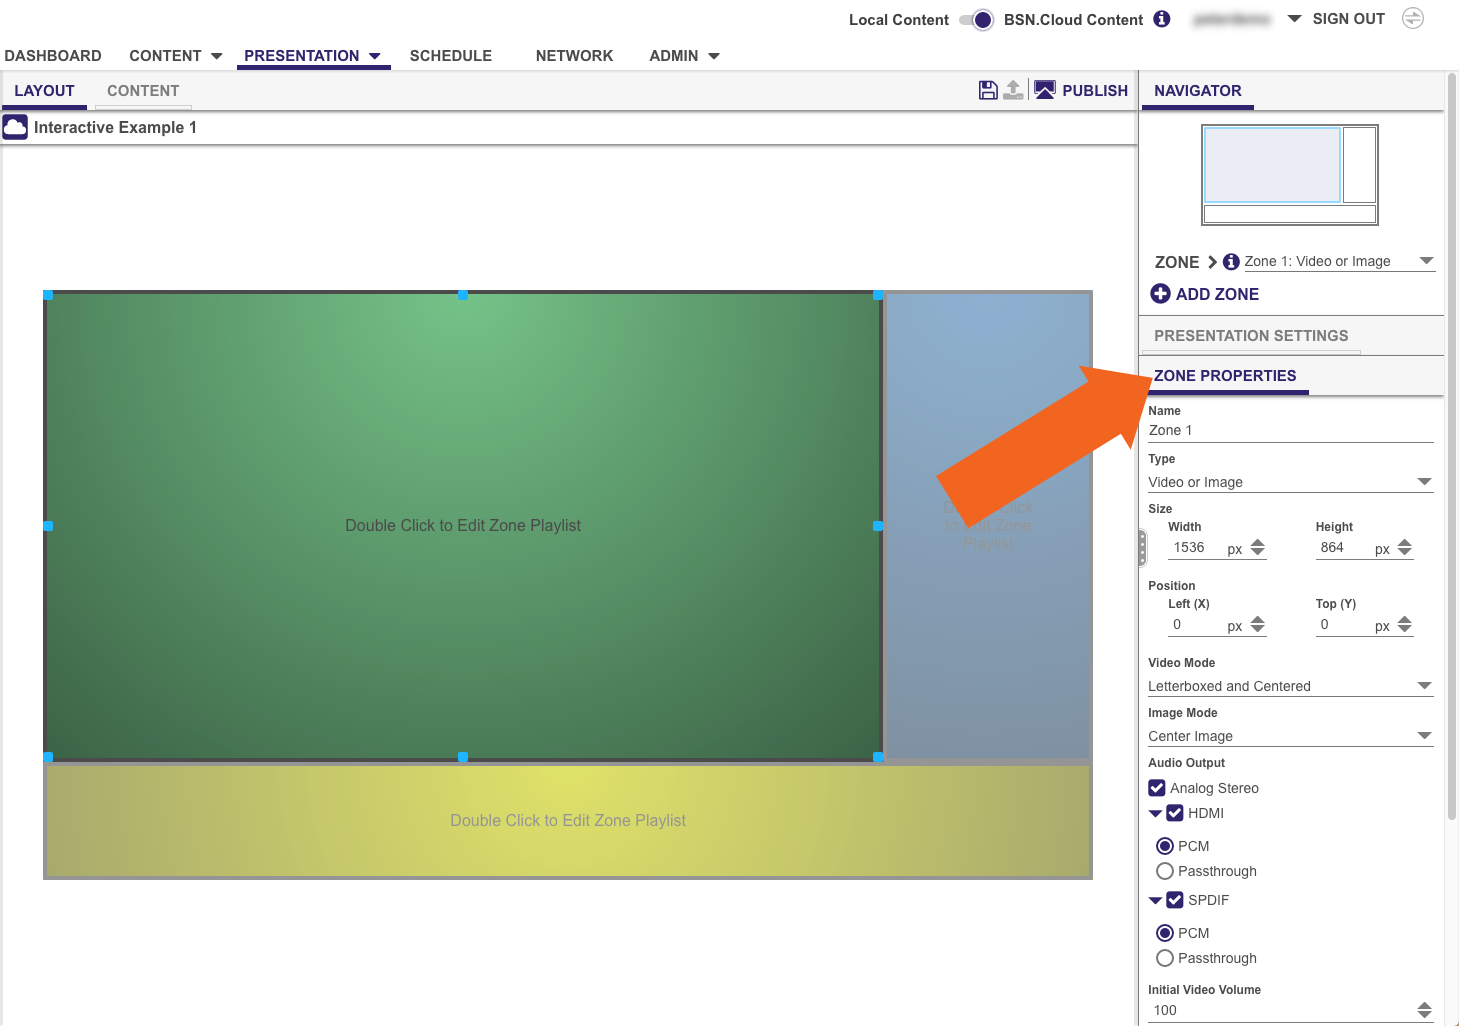
Select a zone in the Layout tab to edit the Zone Properties related to that zone. For invisible zones (Audio or Enhanced Audio), use the Navigator pane to select the zone.
- Name: Edit the zone name.
- Type: Use the dropdown list to change the zone type. The options in this list may be limited by the capabilities of the player, as well as media types that you have already added to the zone playlist.
- Size: Define the pixel Width and Height of the zone (applicable to visible zones only).
- Position: Define the position of the zone by specifying the X and Y coordinates of the top-left corner of the zone (applicable to visible zones only).
| Panel | ||||||||||||
|---|---|---|---|---|---|---|---|---|---|---|---|---|
| ||||||||||||
ON THIS PAGE
|
Video or Image
Video or Image zones allow you to display images, video, and HTML (they can also play audio files).
- Video Mode : Specify how videos will be scaled to fit in the zone. This setting only has an effect if the video and the zone are different sizes.
- Scale to Fill: Scales the video to fill the zone without maintaining the aspect ratio. The video will appear stretched or squashed if the aspect ratios of the video and zone do not match.
- Letterboxed and Centered: Centers the video and adds black borders on the top and bottom. The aspect ratio is maintained.
Fill Screen and Centered: Centers the video and fills the zone. The aspect ratio is maintained, so the video may be cropped if required.
| Note | ||
|---|---|---|
| ||
The Scale to Fill and Fill Screen and Centered options will not remove letterboxing if it's part of the video file. |
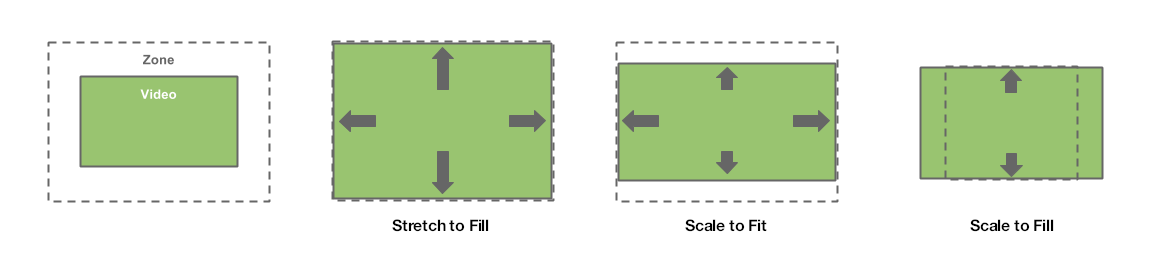
- Image Mode: Specify how images will be scaled to fit in the zone. This setting has no effect if the image and the zone are the same size.
- Center Image: Centers the image without scaling. This may result in cropping if the image is too large.
- Scale to Fit: Scales the image to fit the zone. The image is displayed as large as possible while keeping the correct aspect ratio.
- Scale to Fill and Crop: Scales the image to completely fill the zone while maintaining the aspect ratio.
- Scale to Fill: Scales the image to fill the zone without maintaining the aspect ratio.
Audio Output: Configure audio outputs for the zone.
- Analog Stereo: Check this box to enable audio output via the 3.5mm audio connector (or USB Type C connector on the LS423/LS424).
- HDMI: Check this box to enable audio output via the HDMI® connector.
- Pass through: Supplies the un-decoded audio signal through the HDMI connector. Use this option if the source audio codec (for example, AC3 Dolby Digital) cannot be decoded by the BrightSign player and is being decoded on an external device.
- Stereo: Supplies the decoded audio signal through the HDMI connector.
- SPDIF: Check this box to enable audio output via the SPDIF connector.
- Pass through: Supplies the un-decoded audio signal through the SPDIF connector. Use this option if the source audio codec (for example, AC3 Dolby Digital) cannot be decoded by the BrightSign player and is being decoded on an external device.
- Stereo: Supplies the decoded audio signal through the SPDIF connector.
- Initial Video Volume: Set the initial volume for video files (0-100).
- Initial Audio Volume: Set the initial volume for audio files (0-100).
- Minimum Volume: Set the minimum volume for the zone (0-100).
Maximum Volume: Set the maximum volume for the zone (0-100).
Note title Note The Maximum Volume setting will be overridden by other volume settings in a presentation, including the Initial Volume setting for the zone and volume commands attached to events or states.
- Audio Mixing: Choose the mixing of the audio output:
- Stereo: Outputs both left and right audio signals.
- Left: Outputs the left audio signal only.
- Right: Outputs the right audio signal only.
Video
Video zones allow you to display video files, video streams, or HDMI input.
- Video Mode: Specify how videos will be scaled to fit in the zone. This setting has no effect if the video and the zone are the same size.
- Scale to Fill: Scales the video to fill the zone without maintaining the aspect ratio. The video will appear stretched or squashed if the aspect ratios of the video and zone do not match.
- Letterboxed and Centered: Centers the video and adds black borders on the top and bottom. The aspect ratio is maintained.
Fill Screen and Centered: Centers the video and fills the zone. The aspect ratio is maintained, so the video may be cropped if required.
| Note | ||
|---|---|---|
| ||
The Scale to Fill and Fill Screen and Centered options will not remove letterboxing if it's part of the video file. |
Audio Output: Configure audio outputs for the zone.
- Analog Stereo: Check this box to enable audio output via the 3.5mm audio connector (or USB Type C connector on the LS423/LS424).
- HDMI: Check this box to enable audio output via the HDMI connector.
- Pass through: Supplies the un-decoded audio signal through the HDMI connector. Use this option if the source audio codec (for example, AC3 Dolby Digital) cannot be decoded by the BrightSign player and is being decoded on an external device.
- Stereo: Supplies the decoded audio signal through the HDMI connector.
- SPDIF: Check this box to enable audio output via SPDIF.
- Pass through: Supplies the un-decoded audio signal through the SPDIF connector. Use this option if the source audio codec (for example, AC3 Dolby Digital) cannot be decoded by the BrightSign player and is being decoded on an external device.
- Stereo: Supplies the decoded audio signal through the SPDIF connector.
- Initial Video Volume: Set the initial volume for video files (0-100).
- Initial Audio Volume: Set the initial volume for audio files (0-100).
- Minimum Volume: Set the minimum volume for the zone (0-100).
Maximum Volume: Set the maximum volume for the zone (0-100).
Note title Note The Maximum Volume setting will be overridden by other volume settings in a presentation, including the Initial Volume setting for the zone and volume commands attached to events or states.
- Audio Mixing: Choose the mixing of the audio output:
- Stereo: Outputs both left and right audio signals.
- Left: Outputs the left audio signal only.
- Right: Outputs the right audio signal only.
Image
Image zones allow you to display images and HTML. Use the Image Mode dropdown list to determine how images will be displayed in the zone (this setting has no effect if the image and the zone are the same size):
- Center Image: Centers the image without scaling. This may result in cropping if the image is too large.
- Scale to Fit: Scales the image to fit the zone. The image is displayed as large as possible while keeping the correct aspect ratio.
- Scale to Fill and Crop: Scales the image to completely fill the zone while maintaining the aspect ratio.
- Scale to Fill: Scales the image to fill the zone without maintaining the aspect ratio.
Audio
Audio zones allow you to play audio files and streaming audio.
This section has an accompanying tutorial video:
| Widget Connector | ||||||
|---|---|---|---|---|---|---|
|
| Note | ||
|---|---|---|
| ||
Attempting to play AC3 audio using a BrightSign player will fail if PCM is enabled and AC3 audio is not enabled. |
- Audio Output: Configure audio outputs for the zone.
- Analog Stereo: Check this box to enable audio output via the 3.5mm audio connector (or USB Type C connector on the LS423/LS424).
- HDMI: Check this box to enable audio output via the HDMI connector.
- PCM: Supplies the decoded audio signal through the HDMI connector.
- Passthrough: Supplies the un-decoded audio signal through the HDMI connector. Use this option if the source audio codec (for example, AC3 Dolby Digital) cannot be decoded by the BrightSign player and is being decoded on an external device.
- SPDIF: Check this box to enable audio output via SPDIF.
- PCM: Supplies the decoded audio signal through the SPDIF connector.
- Passthrough: Supplies the un-decoded audio signal through the SPDIF connector. Use this option if the source audio codec (for example, AC3 Dolby Digital) cannot be decoded by the BrightSign player and is being decoded on an external device.
- Initial Audio Volume: Set the initial volume for audio files (0-100).
- Minimum Volume: Set the minimum volume for the zone (0-100).
Maximum Volume: Set the maximum volume for the zone (0-100).
Note title Note The Maximum Volume setting will be overridden by other volume settings in a presentation, including the Initial Volume setting for the zone and volume commands attached to events or states.
- Audio Mixing: Choose the mixing of the audio output:
- Stereo: Outputs both left and right audio signals.
- Left: Outputs the left audio signal only.
- Right: Outputs the right audio signal only.
Enhanced Audio
Enhanced Audio zones provide similar functionality Audio zones, but allow cross-fading between audio files in the playlist: Fading occurs from silence at the beginning of the audio playlist and to silence at the end of the audio playlist, while cross-fading occurs between audio files.
Use the Fade property to specify the duration of cross-fading between audio files. This setting also affects the fade-in and fade-out durations.
Ticker
| Anchor | ||||
|---|---|---|---|---|
|
Ticker zones allow you to display RSS feeds or pre-defined text strings.
This section has an accompanying tutorial video:
| Widget Connector | ||||||
|---|---|---|---|---|---|---|
|
- Rotation: Specify the rotation of text in the zone.
- Text appearance: Specify how the text will appear on screen:
- Animated: Text appears on screen from left to right (similar to a Teletype-style ticker).
- Number of lines: Set the number of text lines in the zone.
- Time to Display Each Line: Determine how long each line displays in the zone (in seconds).
- Static Text: Lines of text appear without any animation.
- Number of lines: Set the number of text lines in the zone.
- Time to Display Each Line: Determine how long each line displays in the zone (in seconds).
- Alignment: Specify whether the static text is left aligned, right aligned, or centered in the zone.
Scrolling: Text scrolls across the screen (similar to a news or stock ticker).
Note title Note Text can scroll either right-to-left or left-to-right: This scrolling direction is determined by the language of the first text item used in the zone (e.g. Spanish text will set the ticker to right-to-left, while Arabic text will set the ticker to left-to-right).
- Scroll Speed: Use the slider to set the scroll speed to 100%, 200%, 300%, or 400% of normal.
- Animated: Text appears on screen from left to right (similar to a Teletype-style ticker).
- Foreground text color: Select a color for text in the zone.
- Background text color: Select a color for the text background in the zone.
- Background bitmap: Check the box to display an image as the text background. You will be prompted to select an image from your BSN Content Cloud library or your local machine (depending on the Storage Selector setting).
- Stretch to Fit: Check this box if you want to stretch the image to fill the zone.
- Font: Select the font type for displaying text in the zone.
- System Font: Displays text using the default Linux font.
- BSN Font: Displays text using a custom font stored on your BSN Content Cloud network. You can use any TrueType font. This option is available when the Storage Selector is set to BSN.Cloud Content.
- Local Font: Displays text using a custom font stored on your local machine. You can use any TrueType font. This option is available when the Storage Selector is set to Local Content.
- Safe Text: Define the dimensions of the text region in the zone.
Clock
Clock zones allow you to display the date or time.
- Rotation: Specify the rotation of text in the zone.
- Foreground text color: Select a color for text in the zone.
- Background text color: Select a color for the text background in the zone.
- Background bitmap: Check the box to display an image as the text background. You will be prompted to select an image from your BSN Content Cloud library or your local machine (depending on the Storage Selector setting).
- Stretch to Fit: Check this box if you want to stretch the image to fill the zone.
- Font: Select the font type for displaying text in the zone.
- System Font: Displays text using the default Linux font.
- BSN Font: Displays text using a custom font stored on your BSN Content Cloud network. You can use any TrueType font. This option is available when the Storage Selector is set to BSN.cloud Content.
- Local Font: Displays text using a custom font stored on your local machine. You can use any TrueType font. This option is available when the Storage Selector is set to Local Content.
- Safe Text: Define the dimensions of the text region in the zone.
Background Image
The Background Image zone allows you to place an image or media feed in the background of your presentation. All other zones appear on top of this zone.
The Background Image zone consumes a video decoder on the BrightSign player. If the player model supports two video zones (e.g. XTx44, XDx34), it can support one Background Image zone and one video zone, while single-video models (e.g. HDx24, LS424) do not support both a video zone and Background Image zone simultaneously.
| Tip | ||
|---|---|---|
| ||
If you want a background color for your presentation, change the Background Color in the Presentation Settings pane. |