| Panel | ||||||||||||
|---|---|---|---|---|---|---|---|---|---|---|---|---|
| ||||||||||||
ON THIS PAGE
|
The BrightSign App for iPad Android and iPhone iOS devices allows you to broadcast commands to BrightSign players and other compatible network devices over your local network using UDP (User Datagram Protocol) packets. The app automatically retrieves UDP events from presentations that are currently active on the network, allowing you to access and activate them using a straightforward UI. You can also use the BrightSign App to modify User Variables, view Remote Snapshots of the display area, and create new UDP Commands on the fly, and access the Diagnostic Web Server (DWS).
The BrightSign App is compatible with all networked BrightSign players. To get the BrightSign App, download it from the Apple Store using your iPad or iPhoneor Google Play Store.
...
Overview
Once you download the BrightSign App from the Apple Store, opening it will take you to the BrightSign App UI. The first time you open the app, the main window will be blank because you have not added any BrightSign players to the app database yet.
...
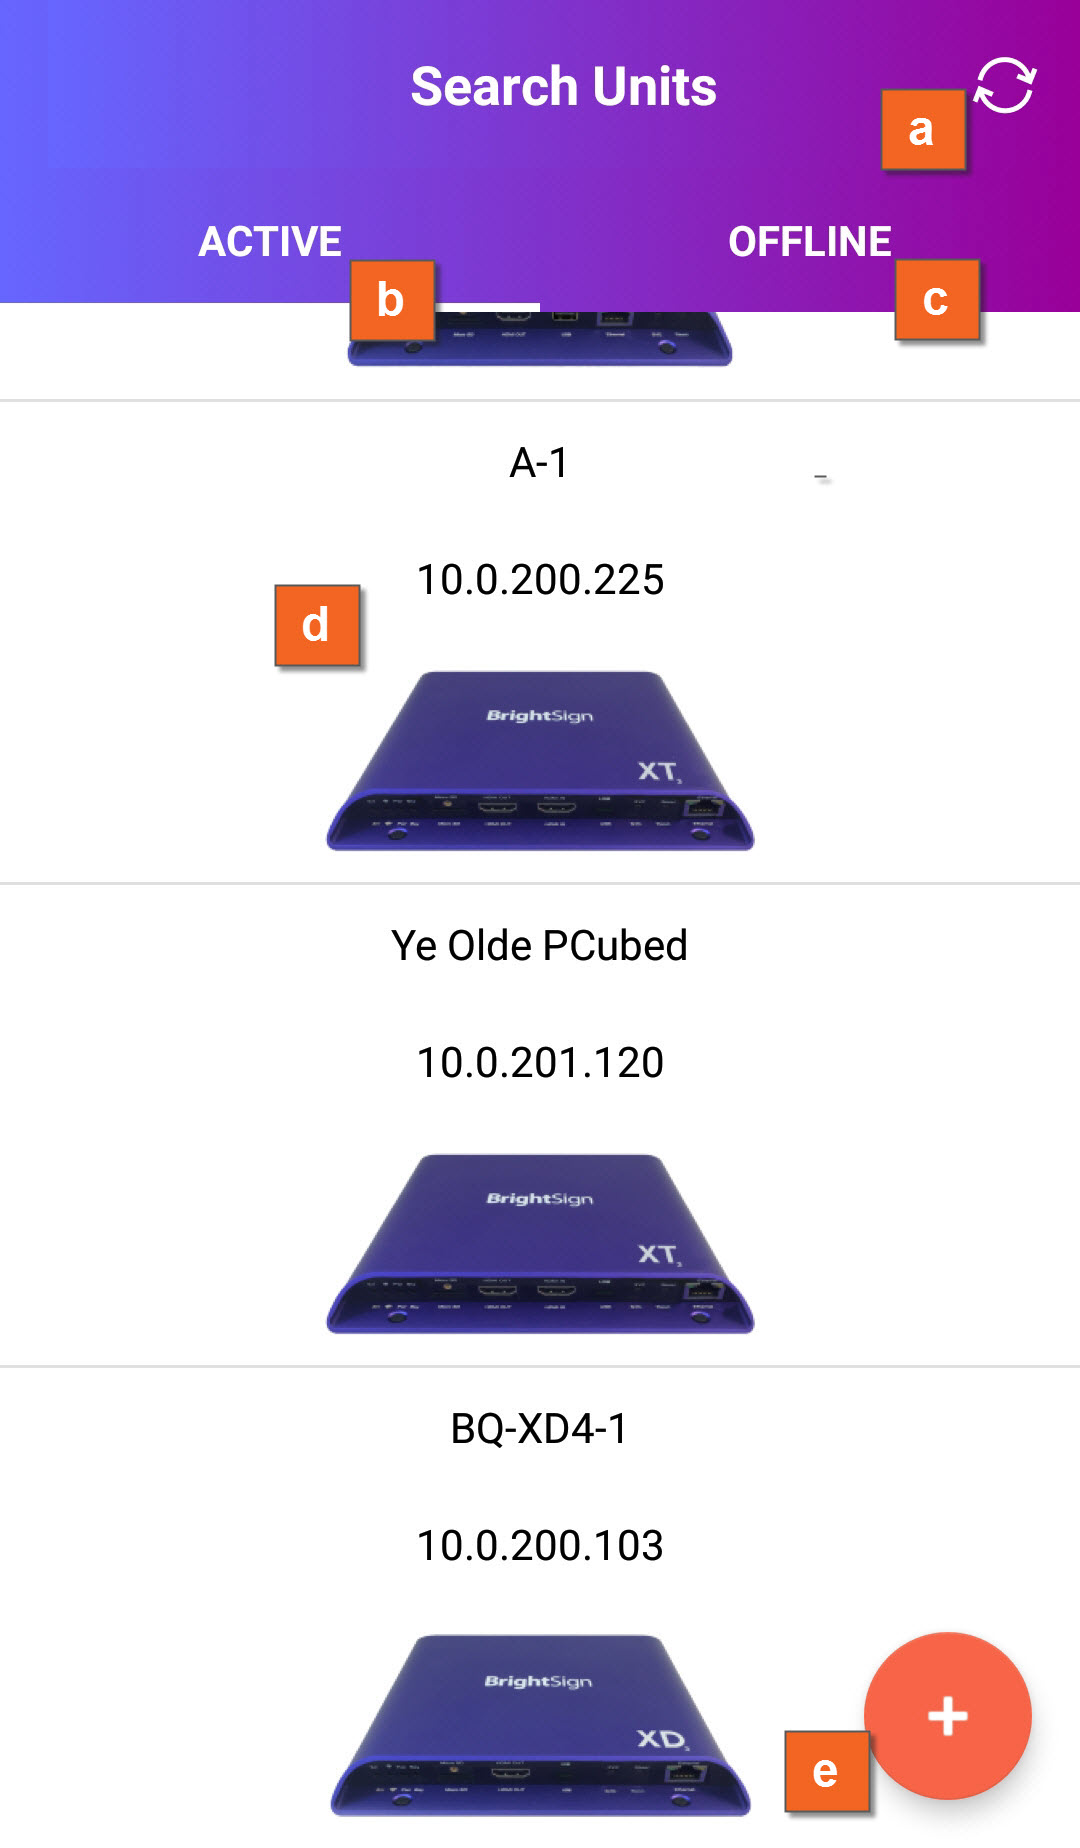
main screen:
a. Refresh: Reloads the
...
list of
...
| Note | ||
|---|---|---|
| ||
The BrightSign App can only connect to one player at a time. |
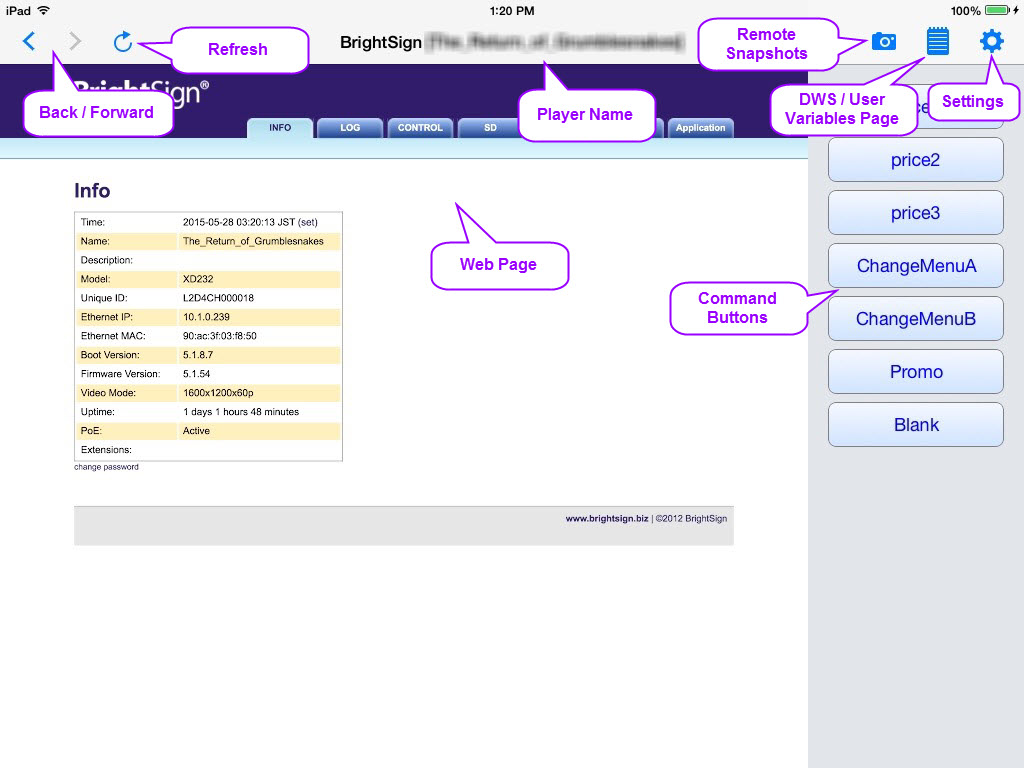
- Remote Snapshots: Takes you to the Remote Snapshots page, which allows you to view screenshots of the display area. This page is only available if Remote Snapshots are enabled during the player setup process in BrightAuthor.
- DWS / User Variables Page: Switches between the Diagnostic Web Server and the User Variables webpage. These pages will only be available if they are enabled during the player setup process.
- Settings: Opens the settings menu, which allows you to add players to the app, select players that have been added, add or edit UDP Commands, and edit the Remote Snapshot settings for a player.
- Web Page: The main area of the App displays either the Diagnostic Web Server or the User Variables page of the player (if they were enabled during the player setup process).
- Command Buttons: Sends commands to the connected player with the press of a button. In the Settings menu, you can designate the title of each button, as well as the UDP data that is sent.
- Actions Menu:(iPhone only) Displays the Command Buttons for use.
Adding Players to the App
...
BrightSign players on the local network. In some instances, you will need to manually add a player to the BrightSign App; see the Adding Players to the App section below for more details.
b. Active: Lists players that are currently active on the local network.
c. Offline: Lists players that were previously active on the local network but are currently unresponsive.
d. Player List: The list of active/offline players. Tapping an active player takes you to the Player Control menu.
e. Add Player: Adds a player to the BrightSign App manually. See the Adding Players to the App section below for more details.
Adding Players to the App
The App will automatically detect BrightSign players on the local network. However, there may be instances when you need to manually add a new player to the BrightSign App database. To do so, follow these steps:
- Ensure that your iPad or iPhone mobile device is connected to the same local network as your BrightSign player.
- Open the BrightSign App.Press the Settings button.
- Tap the
 icon in the BrightSign Unit field
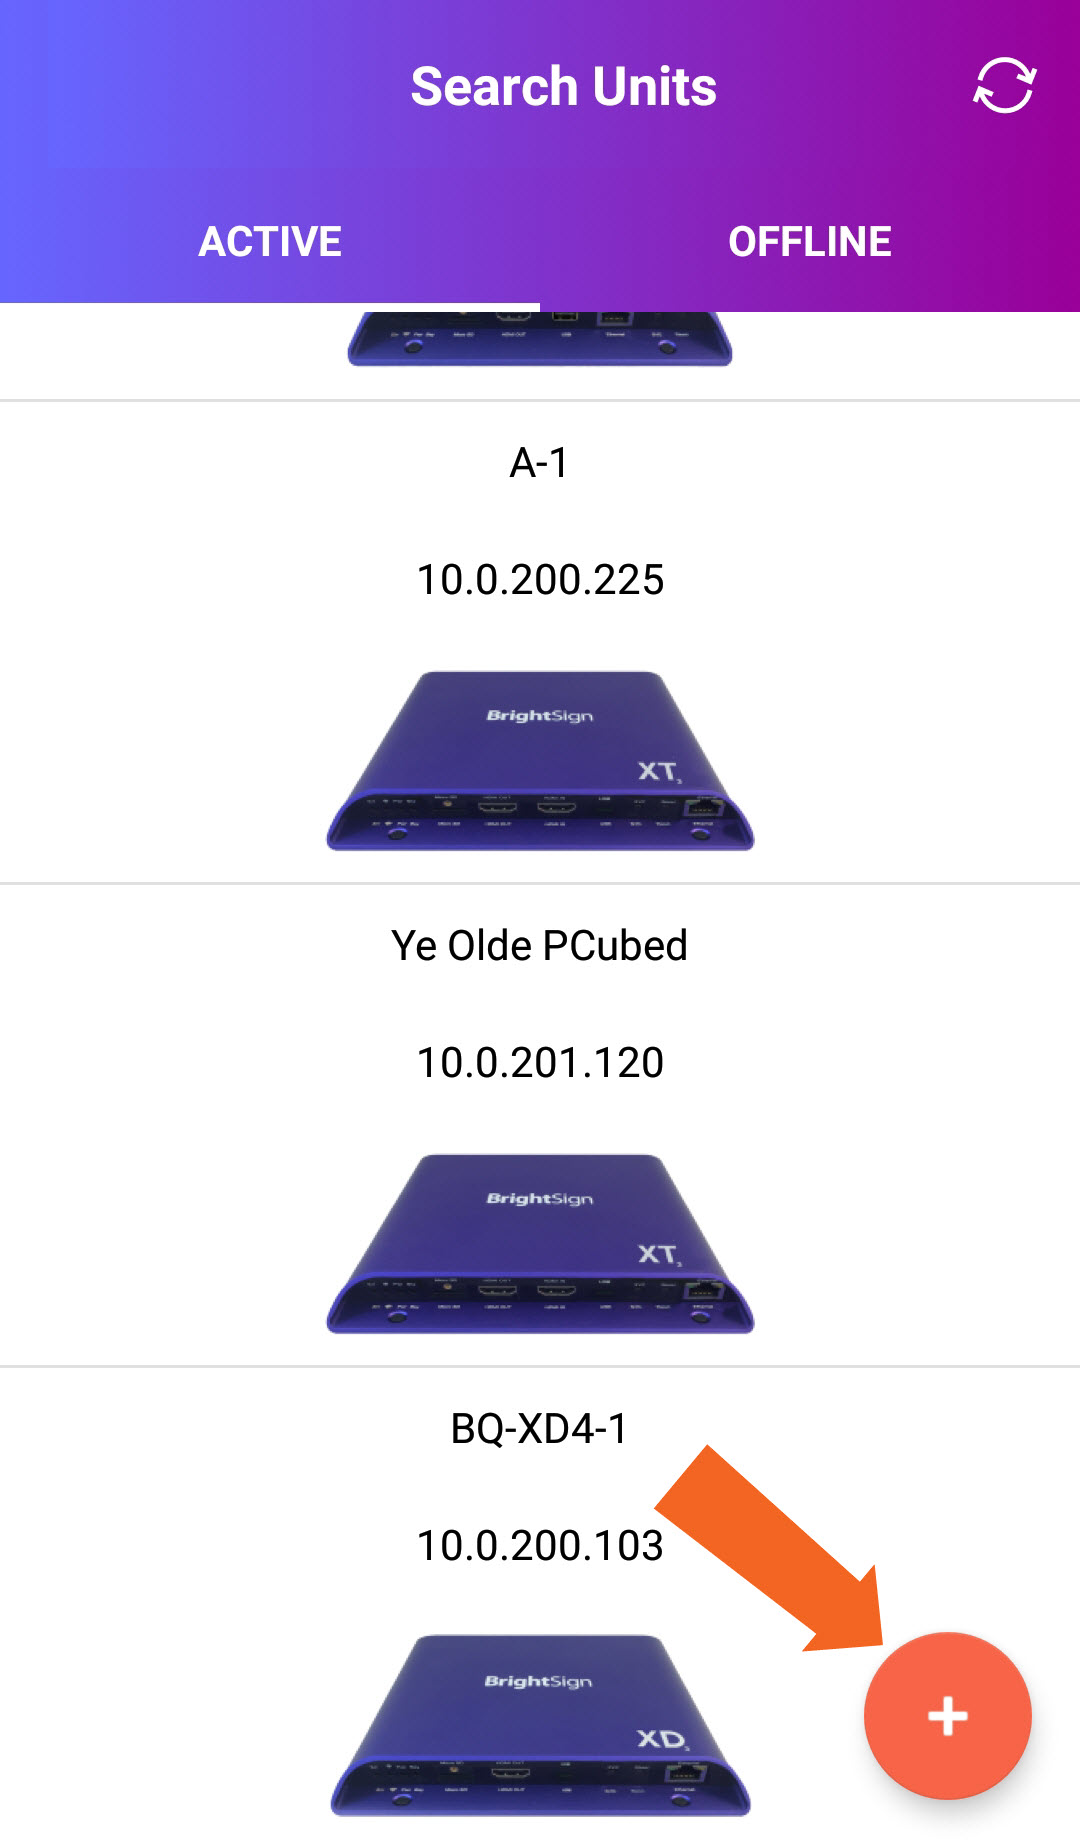
  button in the bottom right of the main screen. This will take you to the Select BrightSign window, which displays all BrightSign players added to the app.
 - Swipe to the bottom of the list and tap the icon in the Manage Active BrightSigns field.
- Tap the icon in the Add Unit field, which is located at the bottom of the list.
- Enter the Search Units window.
- Tap the IP Address field and enter the IP address of the BrightSign player you wish to add to the app database. Then press Search. If you haven’t manually specified the IP address of the player during setup, or if you don’t know the IP address of the player, you can find it by following these steps:
- Power off the player by unplugging the power supply.
- Remove the SD card (as well as any other storage devices).
- Power on the BrightSign player by reconnecting the power supply.
- Wait for the player to boot up: The IP address of the player, along with the serial number and firmware version, will be displayed on the screen.
- After searching, the app will return the name and ID IP address of any player or other device matching the IP address you entered.
- Press Tap the Add button player logo to add the player to the app database. Then press Done.
Switching between Players
...
- player to
...
- the app
...
- Press the Settings button.
- Navigate to the Select BrightSign window by pressing the button in the BrightSign Unit field.
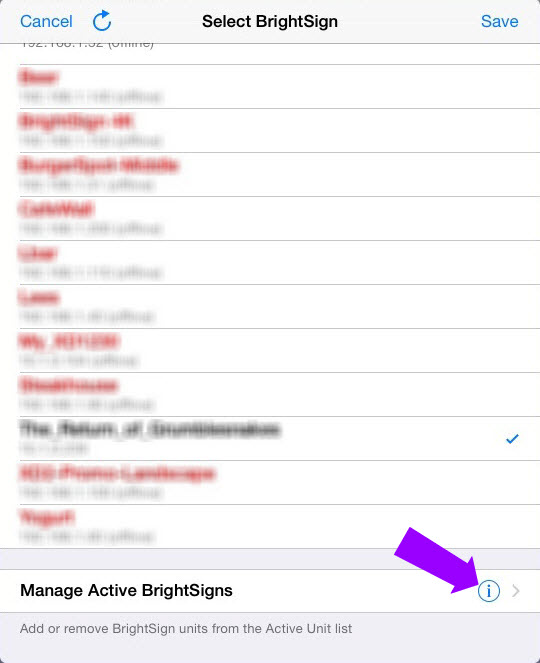
- Tap the unit you wish to connect to. A checkmark will appear next to that unit.
- Return to the Settings page using the button in the top left.
- Save your new selection by pressing the Save button in the top right.
| Note | ||
|---|---|---|
| ||
Players that are red cannot be reached by the app. This could be a result of the player going offline or being on a different network. |
Removing a Player from the
...
App
The BrightSign App does not automatically remove BrightSign players from the Active BrightSign Units listplayer list. If you remove a player from the local network, or if you modify the IP address of a player or remove it from the local networkmanually added player, that player will remain (marked in red) on the Active BrightSign Units the Offline list.
To remove a player from the from the Active BrightSign Units list, follow these steps:
- In the Settings menu, tap the icon in the BrightSign Unit field.
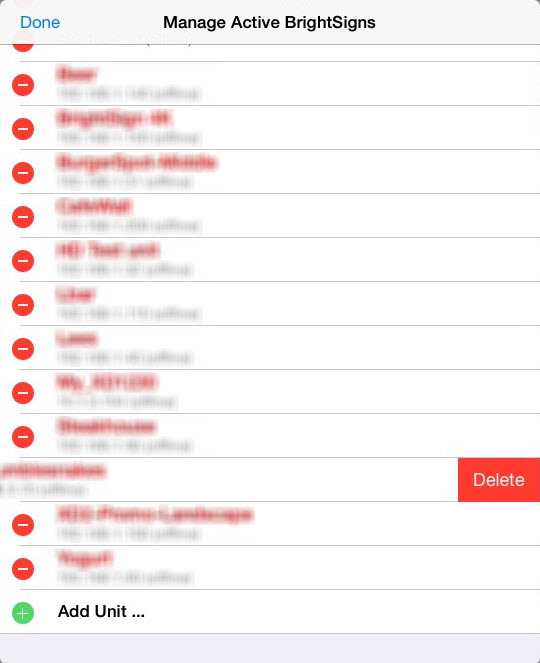
- Swipe to the bottom of the list and tap the icon in the Manage Active BrightSigns field.
- Press a
 button next to a player to reveal the Delete button.
 - Press the Delete button to delete that player from the list.
- Press Done to save the changes you’ve made.
Offline list, press and hold the player icon. Then select the Delete option once it appears.
| Note | ||
|---|---|---|
| ||
Deleting players only removes them from the app database. The settings of the players themselves are not changed in any way. |
Creating and Editing Commands
The BrightSign App automatically populates a list of UDP Commands that are being used in the current BrightAuthor presentation. However, in some cases you may need to manually add command buttons (for example, to send UDP commands to other types of networked devices) or edit existing command buttons.
- Press the Settings button.
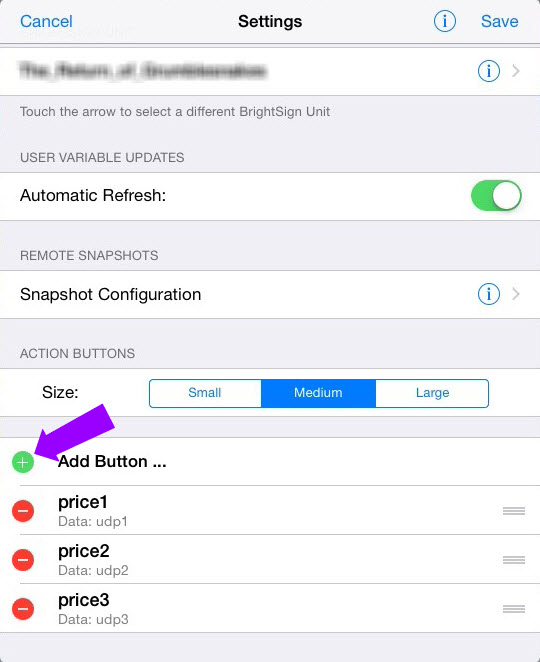
- Use the Small, Medium, and Large Size buttons to edit the size of the Command buttons on the main screen of the app. Making the Command buttons smaller allows you to fit more buttons on the screen.
- Add a new UDP Command button to the UI by pressing
 Add Button…. This will bring up a window that allows you to enter the button Label and Data.
- Label: The name of the button as it is displayed in the Commands field and the Settings menu.
- Data: The command parameter that is sent to the player in the form of a UDP packet. For the BrightSign App to activate the BrightAuthor UDP event, this text must exactly match the text in the Specify UDP input field of the UDP Input Event in BrightAuthor.
- Press the Save button when you are finished inputting the Label and Data.
When the App connects to a player, it assigns a name to each command based on the data of that command. If you would like to edit these default names, double-tap the command name in the Action Buttons list. You can then edit both the Label and Data.
Sending Commands
You can send UDP Commands using the Commands field in the UI. Simply touch one of the command buttons to send the UDP Command string to the currently connected player.
| Tip |
|---|
It is possible to affect multiple players with a single command. Please see the UDP Commands with Multiple Players instructions for more details. |
...
Player Control Menu
| Anchor | ||||
|---|---|---|---|---|
|
To access the Player Control menu, tap a player in the Active list. The Player Control menu has the following sections
Variables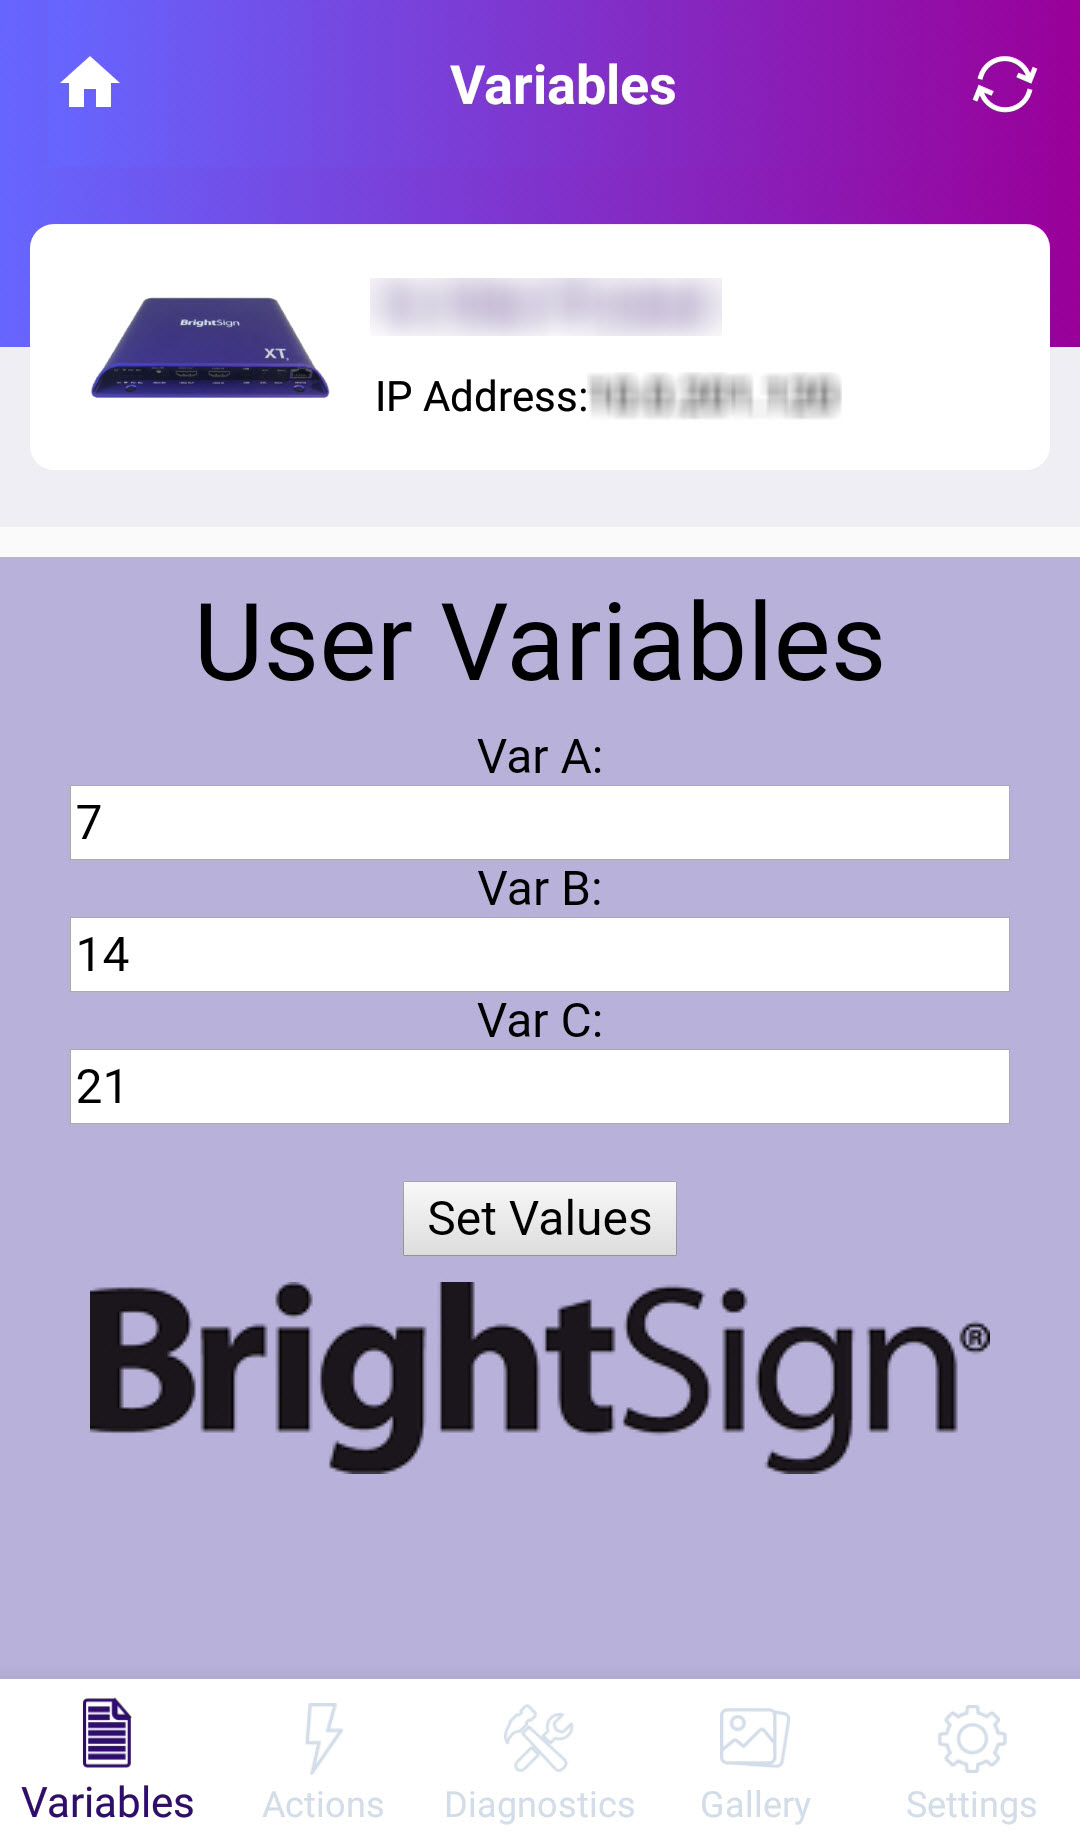
You can use the BrightSign App to change the value of User Variables on a player. User Variables have various uses in BrightAuthor presentations: You can display them on-screen like dynamic price tags, or you can use them as conditionals as conditional targets in in a presentation (for example, by configuring the presentation to play a different video if the variable is equal to a certain value).
By default, the home page of the BrightSign App displays the Diagnostic Web Server. To change the values of User VariablesTo access the User Variables on a player, you need to enable the Local Web Server during player setup. If, during setup, you specified a username/password for the Local Web Server, you will need to switch enter these credentials to access the User Variables webpage by pressing the ![]() icon on the main pagepage in the app.
icon on the main pagepage in the app.
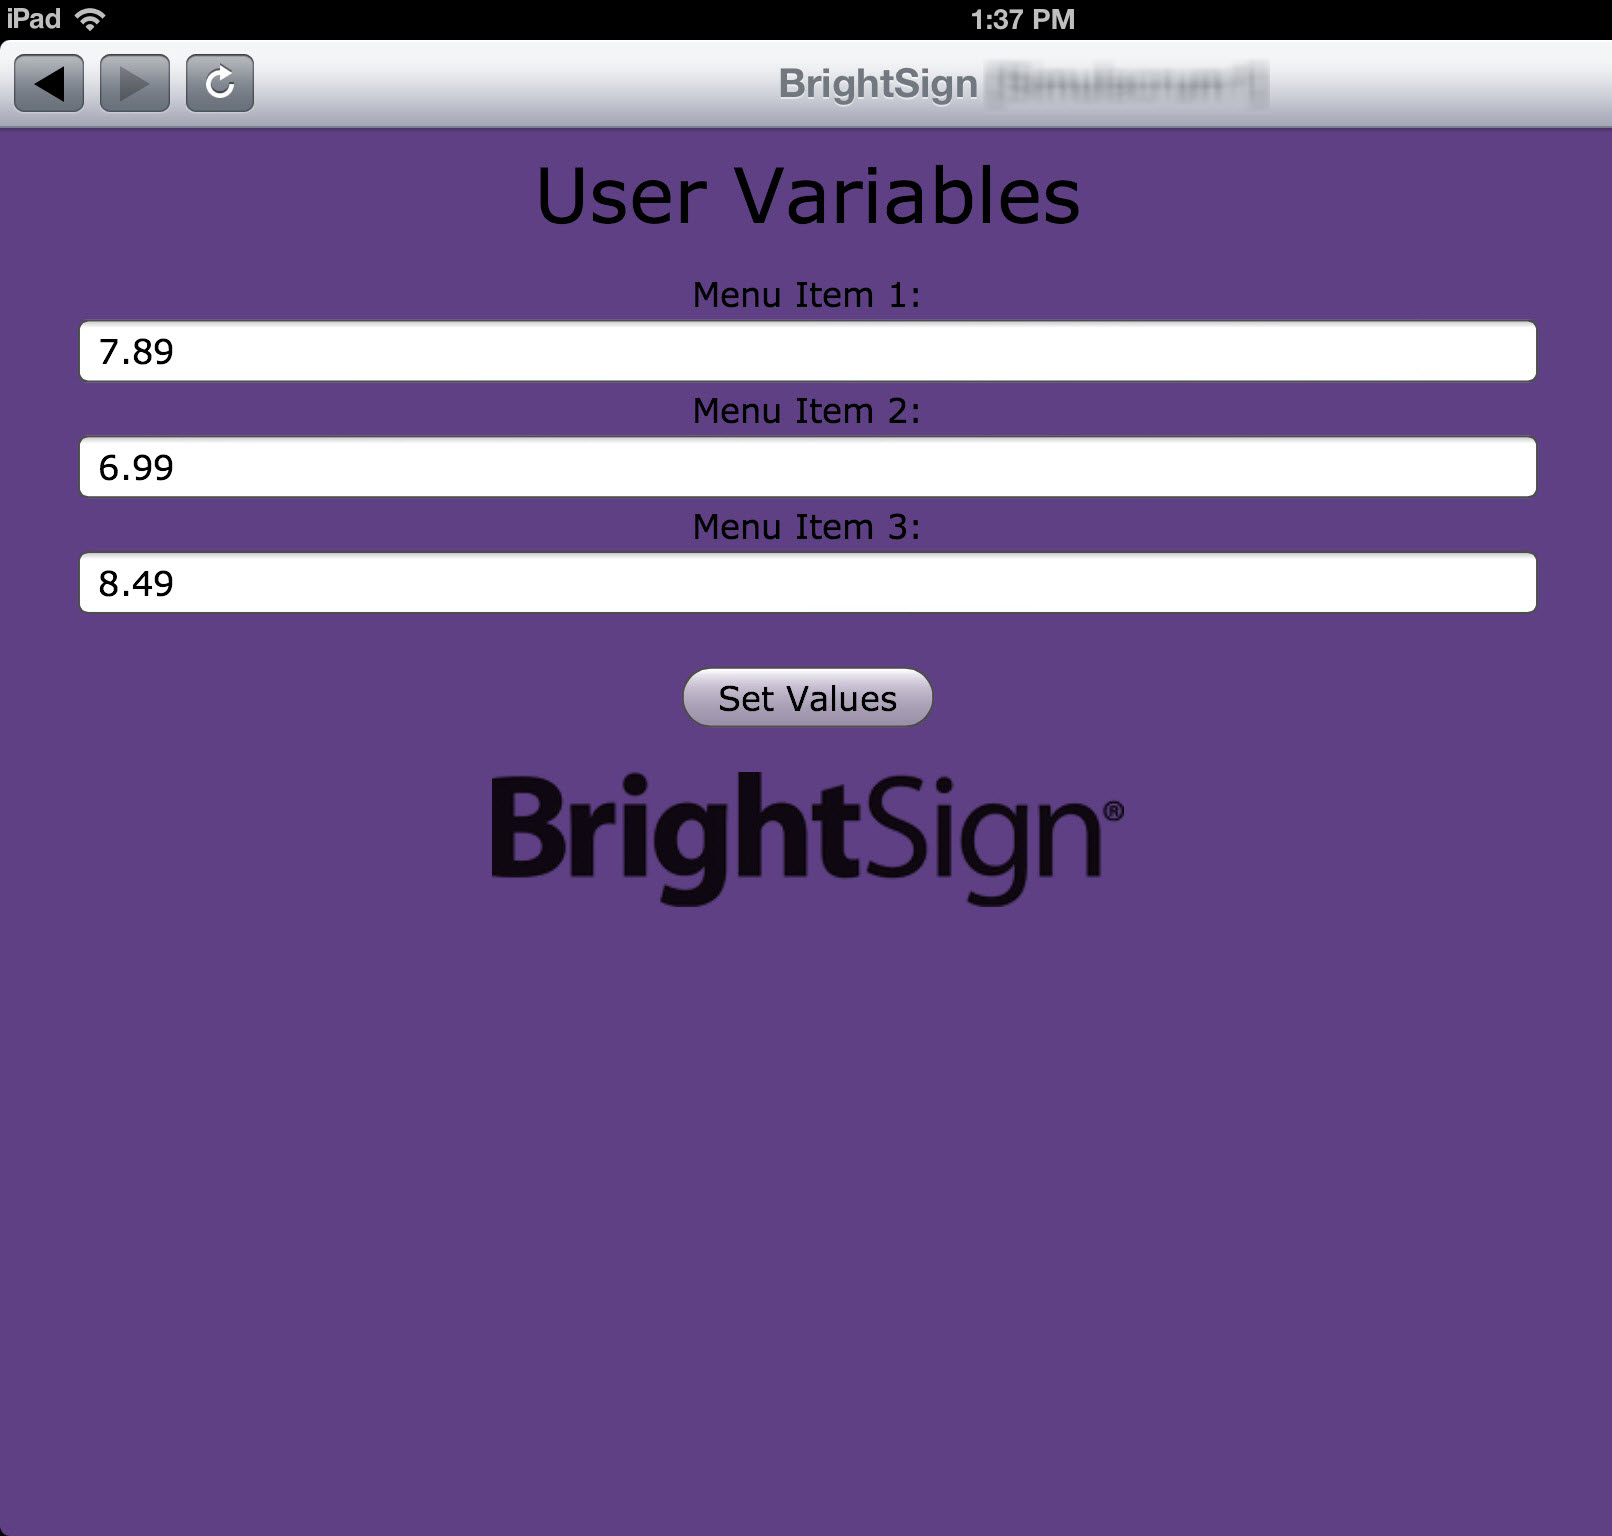
The title above a field reflects the name of the User Variable. The number in the field reflects the current value of the User Variable. To change the value of a User Variable, tap the field, enter a new value, then press press Set Values. If you chose to want the User Variables page to automatically refresh whenever variable values change, enable the Automatic Refresh option in the Settings section (or chose to Enable Update Notifications when when setting up the player, the User Variables page will automatically refresh whenever a variable value changes).
| Note | ||
|---|---|---|
| ||
Like UDP Commands, you can only work with User Variables that are available on the currently selected player. |
...
Actions
The Default section lists UDP Input events that are being used in the current BrightAuthor presentation. Simply touch one of the Action buttons to send the UDP string to the currently connected player.
| Tip |
|---|
It is possible to affect multiple players with a single command. See the UDP Commands with Multiple Players instructions for more details. |
In some cases, you may need to manually add command buttons (for example, to send UDP commands to other types of networked devices) or edit existing command buttons.
- Select a player from the Active player list.
- Tap the Edit button in the upper-right corner of the screen.
- To add a new Action button, select the User Defined command list and tap the button in the bottom-right corner of the screen. This will bring up a window that allows you to enter the Label Name and UDP Command.
- Label Name: The name of the button as it is displayed in the Actions section.
- Data: The command parameter that is sent to the player in the form of a UDP packet. For the BrightSign App to activate a BrightAuthor UDP event, this text must exactly match the text in the Specify UDP input field of the UDP Input Event in BrightAuthor.
- Press the Save button when you are finished configuring.
- To edit an Action, tap and hold the Action label for a moment. You can then edit or delete the Action.
Diagnostics
The Diagnostic Web Server is a helpful tool for managing and monitoring networked players. It is included with the BrightSign App to increase the overall utility of the App, but it is not directly related to the interactive capabilities of UDP Commands or User Variables. Please see the the Diagnostic Web Server Server section to learn more about using this tool.
Viewing Remote Snapshots
Click the Remote Snapshots button in the UI
Gallery
The Gallery section allows you to remotely view snapshots of the presentation display. You can enable and configure Remote Snapshots in the Settings section (see below for more details).
Tap a snapshot to view a larger version of it. You can also rotate snapshots (for portrait-mode presentations) using the "rotate" icons in the upper-right.
Settings
The Settings section allows you to configure various elements of the Player Control Menu
- User Variable Updates: Enable this option box to have the player automatically refresh the User Variables webpage whenever variable values change on the player.
- Remote Snapshot: Configure Remote Snapshots for the Gallery section:
- Enable Remote Snapshots: Enable/disable the Remote Snapshots feature, which allows you to remotely monitor the contents of the presentation display.
- Snapshot
- Snapshot Time/Date: The time when the snapshot was taken. The snapshot frequency can be customized during the player setup process.
- Snapshot List: A list of all snapshots currently stored on the player. During the player setup process, you can customize the number of snapshots that can be stored on the player.
- Rotate: Use these buttons to rotate all images 90 degrees clockwise or counter-clockwise. This is useful if the player is displaying a portrait-oriented presentation. You can also automatically set all snapshots to portrait orientation during the player setup process.
- Save/Export: Use this button to save or export the currently selected snapshot.
...
- Frequency (Minutes): Specify how often the player should take a snapshot of the presentation display.
- Number of Snapshots to Save: Specify how many JPEG snapshot images can be stored on the local storage of the player.
- JPEG quality level: Specify the quality level (and thus the file size) of each image file.
- Portrait mode display: Enable/disable Portrait Mode display. This instructs the player to rotate the snapshots to portrait mode before saving and uploading them. Changing this setting will not affect images that have already been uploaded to the BrightSign App.
- Action Buttons: Use the Small, Medium, and Large size buttons to edit the size of the Action buttons in the Action section. Making the buttons smaller allows you to fit more buttons on the screen.