| Expand | ||
|---|---|---|
| ||
|
...
To upload an HTML site to your BSN.cloud library, navigate to Content > New Component > Upload HTML Site.
...
| Info |
|---|
All assets for an HTML5 site should be contained in a single folder to ensure that they can be easily selected and uploaded (only include the HTML assets to avoid uploading unrelated items). |
...
Site Name: Enter a name for the HTML site for easy identification in the BSN.cloud library.
Upload as Device Web Page: Check this box if you want to use the HTML site as a Device Web Page.
Browse to Select Site Index: Select the .html file of the site that you wish to upload.
Upload: Click this button to upload the HTML site (including the index.html file and all assets).
...
Dynamic Playlists allow you to easily update content across multiple presentations on your network. When you modify a Dynamic Playlist, every presentation that includes the Dynamic Playlist receives these changes. This means that a single update can reach numerous presentations.
| Tip |
|---|
Example You have several groups on your BSN.cloud network playing different presentations based on their location. However, you have a playlist of daily deals you wish to apply to all of your presentations. Instead of updating each presentation individually, you can include a single Dyanmic Playlist in them. When you update the Dynamic Playlist, the changes are broadcast to all your players automatically. |
Adding a Dynamic Playlist
To create a Dynamic Playlist, navigate to Content > New Component > Dynamic Playlist or go to the the Components > Dynamic Playlists directory and click the ![]() New Dynamic Playlist icon.
New Dynamic Playlist icon.
...
Library: Select a folder containing media files that you wish to add to your Dynamic Playlist.
Assets: Drag and drop media files from the folder into the playlist area to add them to the Dynamic Playlist.
Select All: Click to select all files in the folder. Alternatively, you can hold down shift to select any number of files to drag into the playlist area. Click Clear Selection to clear your multi-selection.
Search: Enter text in the search field to search the folder for a filename.
Sort: Use the dropdown list to select a sort criteria. Use the

icon to toggle between ascending and descending order.
Refresh: Click the icon to query the contents of the folder again.
Resize: Use the dropdown menu to change the size of the image thumbnails in the Assets pane.

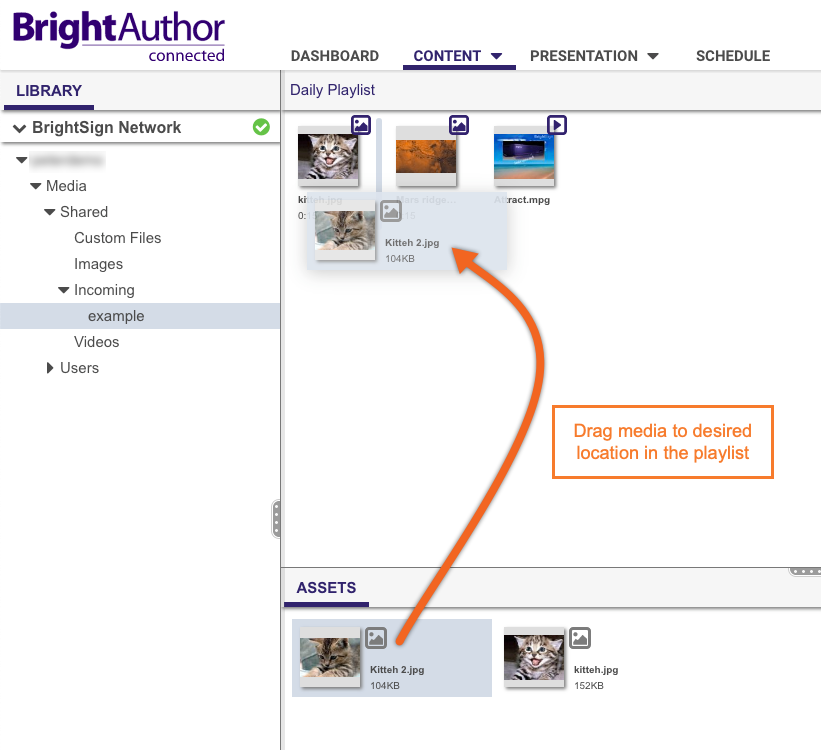
Playlist Area: Edit the playlist order by dragging items to different positions in the playlist. To remove an item from the playlist, hover your cursor over the thumbnail and click the icon when it appears.
Save: Click the icon to save the Dynamic Playlist to your BSN.cloud network or select Save As from the file drop down menu.
Properties: Select a media item to view properties associated with it:
Asset Name: The filename of the media item.
Time On Screen (images only): Specify the amount of time (in seconds) that the image should be displayed before transitioning to the next item.
Volume (videos and audio only): Specify the volume of the media.
Enable Validity Date: Check the box to assign a validity date to the media item. If this box is checked, the file will only be included in the Dynamic Playlist between the specified Start Time/Date and End Time/Date. A playlist item with a validity date will have an icon in the top left to indicate its current status:
The item is not currently included in the Dynamic Playlist because the validity Start Time/Date begins in the future.
The item is currently included in the Dynamic Playlist.
The item is not currently included in the Dynamic Playlist because the validity End Time/Date has passed.
...
Library: Select a folder containing media files that you wish to add to your Live Media Feed.
Assets: Drag and drop media files from the folder into the feed area to add them to the Live Media Feed.
Select All: Click to select all files in the folder. Alternatively, you can hold down shift to select any number of files to drag into the playlist area. Click Clear Selection to clear your multi-selection.
Search: Enter text in the search field to search the folder for a filename.
Sort: Use the dropdown list to select a sort criteria. Use the
icon to toggle between ascending and descending order.
Refresh: Click the icon to query the contents of the folder again.
Resize: Use the dropdown menu to change the size of the image thumbnails in the Assets pane.


Feed Area: Edit the feed order by dragging items to different positions in the playlist.
Expand: Click the icon to edit information about the feed item:
Title: Enter a key for the item.
Description: Enter a value to associate with the key.
Add Item Data: Click the button to add a custom name/value pair to the item
Move Item: Click and hold the icon to move a feed item to a different position in the feed.
Delete: Click the icon to remove an item from the feed.
Save: Click the icon to save the Live Media Feed to your BSN.cloud network or select Save As from the file drop down menu.
Properties - Media Feed: Displays properties associated with the feed.
Name: The name of the Live Media Feed
TTL: Specify how long the feed will remain on the player (in minutes) before it is refreshed using the source URL.
Properties - Media Feed Item: Displays properties associated with the currently selected media feed item:
Order: Enter an index number to move the item to a different position in the feed. The index begins at 1.
Duration: The amount of time an image is displayed or audio/video file is played. A value of 0 indicates that the image will be displayed continuously.
Enable Validity Date: Check the box to assign a validity date to the item. If this box is checked, the item will only be included in the Live Media Feed between the specified Start Time/Date and End Time/Date. Start Time and End Time assumes the time is entered in UTC timezone (not the local time of the user). An item with a validity date will have an icon in the top left to indicate its current status:
The item is not currently included in the Live Media Feed because the validity Start Time/Date begins in the future.
The item is currently included in the Live Media Feed.
The item is not currently included in the Live Media Feed because the validity End Time/Date has passed.