...
| Expand | ||
|---|---|---|
|
...
|
...
...
| Panel | ||||||||||||
|---|---|---|---|---|---|---|---|---|---|---|---|---|
| ||||||||||||
ON THIS PAGE
|
| Tip |
|---|
| Expand | ||||||||||||||
|---|---|---|---|---|---|---|---|---|---|---|---|---|---|---|
| ||||||||||||||
|
| Tip |
|---|
TipThis tutorial video outlines the basic steps for creating a full-screen presentation. |
In a full-screen presentation, your images and videos occupy the entire screen.
Creating a New Project
To create a new presentation project, navigate to File > New Presentation. If If you don’t see New Presentation under File, make sure you have the Edit, Publish, or Manage tab selected.
Specify the following in the New Project window: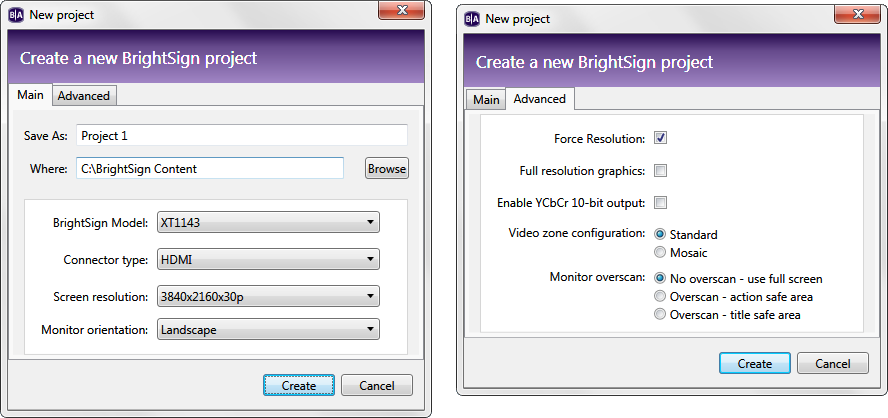
...
Main
Save as: Enter a name for the presentation project.
Where: Click Browse to select the folder where you want to save the presentation project.
BrightSign model: Select the target player model for the presentation. This will determine the options available when creating the presentation in the Edit tab.
Connector type:Select the video connector type that connects the player to the display: HDMI®, VGA, or Component.
Screen resolution: Choose a resolution that matches the native resolution of your monitor. You can view all available screen resolutions in this FAQ.
| Note | |
|---|---|
| title | NoteYou can output a composite signal to a converter by selecting the "HDMI" or "Component" Connector type and choosing one of the available composite video modes. See this FAQ for more information on generating component and composite signals. |
Monitor Orientation: Select a monitor orientation for your presentation:
Anchor monitor_orientation monitor_orientation Landscape: Content is not rotated.
Portrait – bottom on left: Content is rotated counter-clockwise 90 degrees. Select this option if the bottom of the monitor is on the left when it is portrait oriented.
Portrait – bottom on right: Content is rotated clockwise 90 degrees. Select this option if the bottom of the monitor is on the right when it is portrait oriented.
...
| Note | |
|---|---|
| title | NoteChoosing a portrait mode will rotate all images, videos, and HTML. However, for HDx20 and LSx22 models, content is not rotated on the player. Instead, you will need to rotate video or images in the source application (e.g. Photoshop, Adobe After Effects) before publishing them to the player. |
Advanced
Force Resolution: Check this box to have the player output the selected Screen resolution even if the display reports over HDMI/VGA that it does not support this resolution. If this box is unchecked, the player will attempt to use the selected Screen resolution first, but will then fall back to the highest resolution supported by the display if it is unsupported.
Anchor full_resolution_graphics full_resolution_graphics Full resolution graphics: Check this box to enable full-resolution graphics for the selected Screen resolution. When this box is checked, the graphics plane (images, text, HTML animations, etc.) is rendered at the same size as the video output, rather than being upscaled to the output resolution after rendering. This option is only available for certain video modes larger than 1920x1200; all smaller video modes use full-resolution graphics automatically. This setting is subject to additional restrictions based on the resolution and player model–see here for full details.
Enable YCbCr 10-bit output: Check this box to output a 10-bit color video signal to the connected display. See the video encoding FAQ for more details on supported 4K color spaces and bit depths.
Video zone configuration: Determine how video resources will be divvied up in the presentation:
Standard: You can have one or two video zones (depending on whether your player model supports dual decode), and these zones can play video files up to the maximum resolution (either HD or 4K) supported by your player model.
Mosaic: You can have more than two video zones. The maximum number of video zones depends on the Maximum content resolution setting in the Edit > Layout tab: The smaller the maximum resolution, the more video zones you can add.
Monitor overscan:Select an overscan setting to determine how the content fills the display screen.
Anchor monitor_overscan monitor_overscan No overscan – use full screen: Displays content to the edge of the video signal.
Overscan – action safe: Restricts the display area to a size that is compatible with most displays.
Overscan – title safe: Restricts the display area to a size that is much smaller than the generated video signal.
| Tip |
|---|
Overscan is necessary with some older television screens that cut off content at the edges of the screen. |
Click Create when you are finished configuring the presentation. The Template window will open. Click the Full screen template, then click Choose.
Adding Content to the Presentation Playlist
To add content to your presentation, first designate a folder on your computer as your Media Library. This will make it easy to drag and drop image, video, and audio files into your playlist from a scrollable list of thumbnails.
Under Media Library, select the files tab.
Click to open the file browser.
Navigate to the folder where your content is stored.
Click OK.
| Note | |
|---|---|
| title | NoteIf your content folder contains large files, it may take a while for the thumbnail images to appear. |
...
Add media files to your presentation by dragging filesfrom the Media Library to the playlist area. You can do the following when adding media files:
Select a series of adjacent media files – Hold the Shift key as you select the files in the Media Library.
Select a group of non-adjacent files – Hold the Ctrl keyas you select the files in the Media Library.
Refresh the Media Library – Click . This will update the Media Library with any changes to the corresponding folder on your computer.
Move up to the parent directory of the current folder – Click .
Move to a sub-directory of the current folder – Click a file thumbnail in the Media Library.
| Tip | |
|---|---|
| title | TipYou can also drag and drop media files directly into the playlist from a Windows Explorer window. |
Editing the Presentation Playlist
Once you've added media files to the playlist, you can modify it by doing any of the following:
Remove an item from the playlist – Click an item in the playlist area and press the Delete or Backspace key.
Change the order in which an item plays – Click and drag an item to a new position in the playlist.
Rename the playlist – Click Edit in the upper-right corner of the playlist area.
Change the playlist view – Click the list/tile icon in the top-right of the playlist area to change the playlist view. Switching to a list view allows you to see the parameters of all media items and states in the playlist.
Replace media files in the playlist
–Go to File > Replace media files. The Replace Media Files window allows you to replace files within media states without having to drag and drop individual files. This is useful if you need to update a large number of media files in your playlist or if you want to ensure the playlist order is preserved.Anchor replace_media_files replace_media_files Replacement Media Folder: Click Browse to select the folder that contains the files you want to add. This can be the same folder as your Media Library, or another folder.
Preserve state names: Check this box to preserve the names of the media states in the playlist. If this box is unchecked, the current media states will automatically take on the names of the new media files.
Presentation Media Files: For each file listed under Current Media Files, select a new file using the dropdown list beneath Replacement Media File.
Editing Media Playback Options
To edit the playback settings of a media item, double-click the thumbnail in the playlist area (or right-click and select Edit), then choose the settings you want to apply to the selected item:
Image files: Specify the following:
Time on Screen: The amount of time (in seconds) that the image displays on screen before transitioning to the next item.
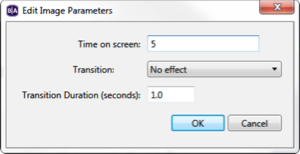
Transition: The transition effect that occurs from the previous media item to this image.
Transition Duration: The duration (in seconds) of the transition effect .
Video files: Specify the Volume of the video.
Audio files: Specify the Volume of the audio track.
To edit settings for multiple items, press the Ctrl key and select items in the playlist. On the menu bar, select Edit > Selected Items, and then choose the settings you want to apply to the selected items. Note that the selected items must all be the same media or state type for this to work.
Next Steps
Now that you've created your full screen presentation, save it by navigating to File > Save [project name] (make sure you have the Edit tab selected). Then, do any of the following:
Publish the presentation – Click the Publish tab and select your publishing method. See the Publishing Presentations section for more instructions.
Export the presentation – Navigate to File > Export [project name]. This saves the presentation project as a package that can be opened by BrightAuthor instances on other computers.
Save the presentation using a new name or location – Navigate to File > Save [project name] As.
Create another presentation – Navigate to File > New Presentation.