4.6-Advanced Features
ON THIS PAGE
This section outlines advanced features offered by BrightAuthor.
Importing and Exporting
There are three types of import/export actions available from the File menu: Export Presentation, Import/Export User Variables, and Import/Export User Events.
Export Presentation
Exporting a BrightAuthor presentation makes it easier to transfer that project between different PCs and versions of BrightAuthor. Navigate to File > Export… and select a folder for export. All relevant presentation files, including media files and user defined events, will be placed in the target folder. You can open the project by double-clicking the .bpf file that was exported.
Import/Export User Variables
You can transfer the User Variable set of one presentation to another. This saves time when you are creating multiple presentations that use the same set of User Variables. The User Variable set is exported as a .buv file, which is also an editable XML document.
Note that importing networked User Variables to a new presentation does not import the Data Feeds to which those variables are linked. If you import networked User Variables, you will need to recreate the associated feeds in the Presentation Properties > Data Feeds tab and reassign them to the variables.
Import/Export User Events
These actions allow you to transfer User Defined Events between presentations. This is useful when creating multiple presentations that use many of the same or similar events.
Presentation Tree View
The Presentation Tree View feature allows you to view a presentation as a set of expandable/collapsible zones, states, events, and commands. You can use this feature to easily navigate all state information in a presentation without double-clicking numerous icons and navigating through tabs. You can access this feature by navigating to File > View Presentation Tree.
RF Channel Scanning
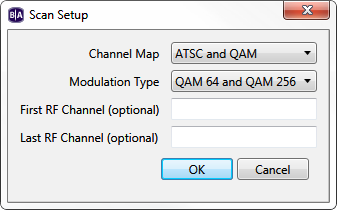
Before you can use the RF In state to display live video, you will first need to perform a channel scan. You can perform a channel scan either as an independent action (similar to setting up a player) or as a state in an interactive presentation. The user interface for the Scan Setup window is the same for both methods. See the Tuner Scan page for more information about using channel scanning in an interactive presentation.
Follow these steps to perform a channel scan as an independent action:
- Navigate to Tools > Setup RF Channel Scan.
- Channel Map: Select QAM, ATSC, or ATSC and QAM (consult your service provider for details).
- Modulation Type: Select QAM 64, QAM 256, or QAM 64 and QAM 256 (consult your service provider for details).
- First RF Channel (optional): You can choose to limit the range of the channel scan by selecting the first channel to scan.
- Last RF Channel (optional): You can choose to limit the range of the channel scan by selecting the last channel to scan.
- Click OK and write the channel scan settings to an SD card or USB drive.
- Power off your BrightSign XD1230.
- Insert the SD card or USB drive into the player and power it back on. The progress of the channel scan will be displayed on screen.
- Once the scan is complete, the channel settings will be written to the internal registry of the player (i.e. the non-removable storage). You can now use the RF In state to tune to any virtual channels that were detected in the channel scan.
Each channel takes approximately one second to scan. Specifying First RF Channel and Last RF Channel will reduce the amount of time it takes to perform the scan. You should only use these two options if you are familiar with the channel map of the cable source.
Publishing Channel Scan Results
If you are connecting multiple XD1230 players to the same cable source, you can transfer the results of a channel scan from one player to another during the setup process.
- After performing a channel scan, reinsert the SD card or USB drive into your PC.
- In BrightAuthor, navigate to Tools > Setup BrightSign Unit.
- Specify device settings as desired (see the Setting up BrightSign Players for more details).
- Under RF Channel Scan Data (optional), click browse and locate the “ScannedChannels.xml” file in the SD card or USB drive directory. Click Open.
- Publish the setup files to the player. The player will now have the same channel configuration as the original XD1230.
