Copy of State Properties
- BrightSign TechDocs
ON THIS PAGE
Overview
The State Properties pane allows you to view and edit settings associated with a state in a playlist. To view the State Properties of a state, select a state that is part of your playlist in the Content tab. Each state will have different properties associated with it. However, the State Properties pane for all states will contain an Advanced menu, which allows users to add entry and exit commands to that state.
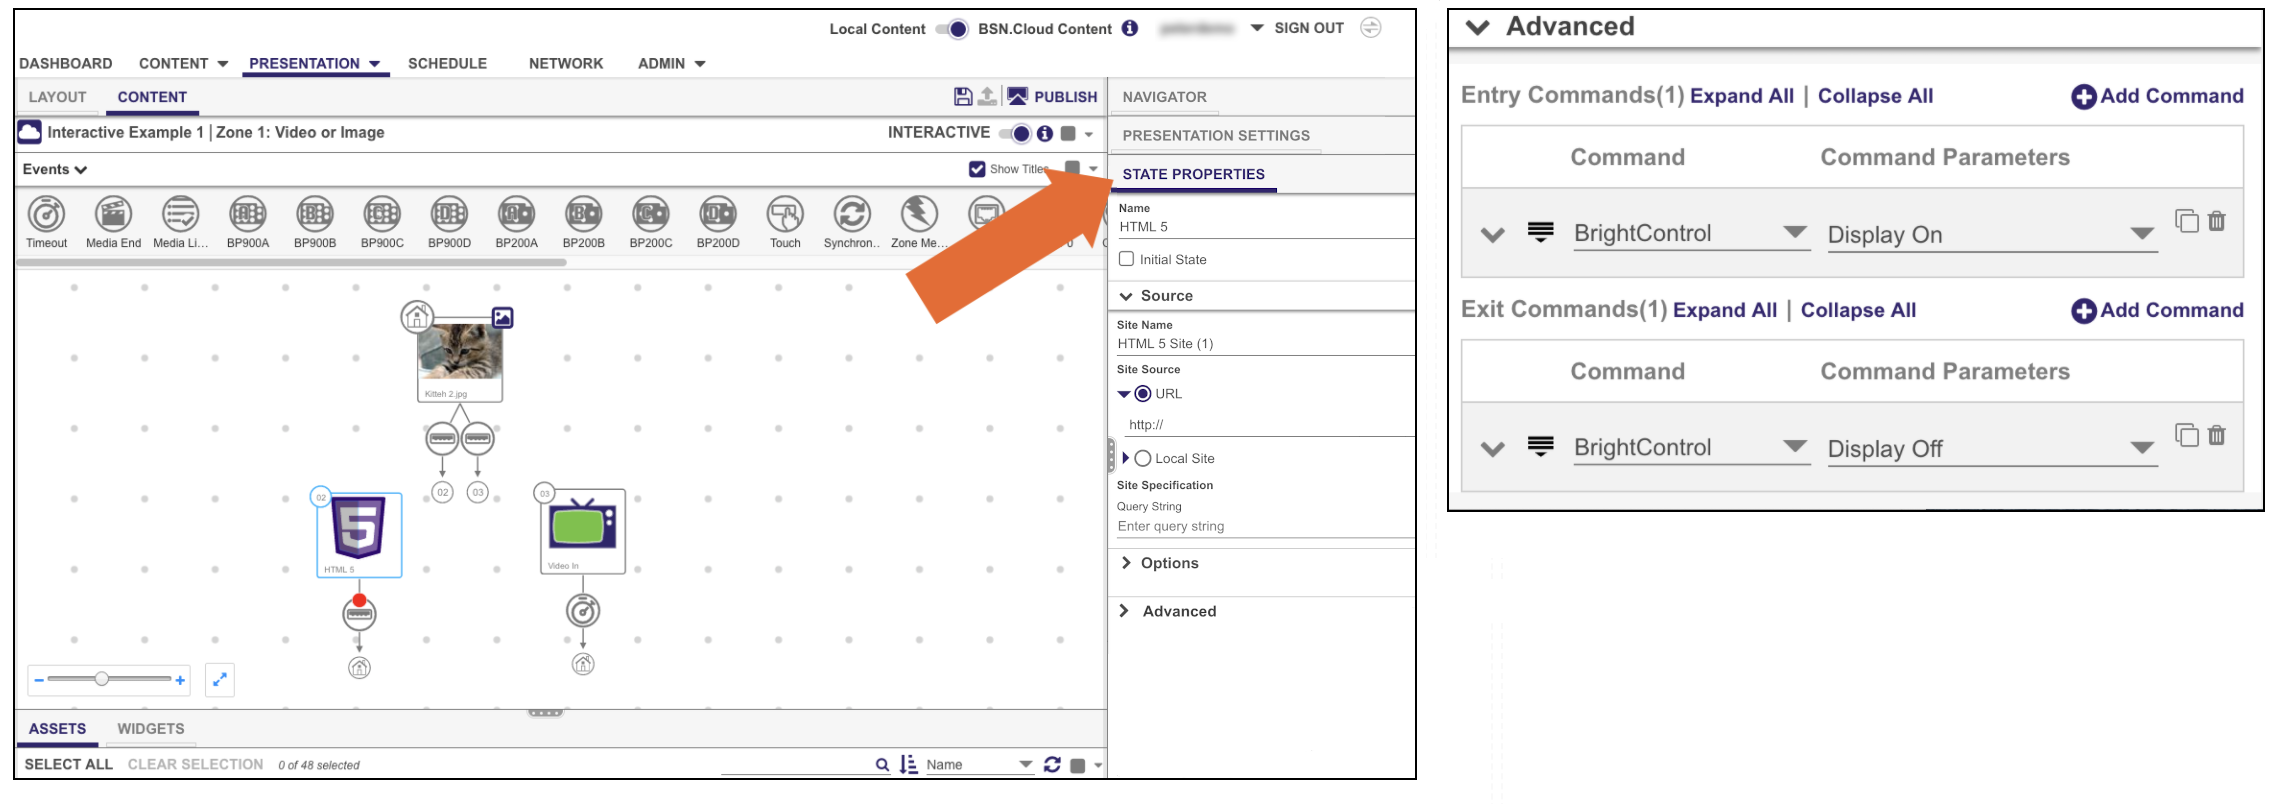
Image State
An image state represents a single image file.
- Effect: Select an effect that occurs when the playlist transitions to the image state.
- Duration: Specify the duration of the transition effect.
Video State
A video state represents a single video file.
- Loop media if no media end transition is specified: Choose this option to loop the video indefinitely when no Media End event is attached to the state.
Hold last video frame if no media end transition is specified: Choose this option to display the last frame of the video after it ends when no Media End event is attached to the state.
Important
Volume can only be changed using the Set Volume command when the presentation is interactive. Video states in a non-interactive state still utilize the Set Volume option in State Properties.
Audio State
An audio state represents a single audio file.
- Volume: Specify the volume of the audio.
HTML5 State
The HTML5 state allows you to display HTML web pages, including video, image, text, and JavaScript elements. For a full explanation of how to create HTML content for BrightSign players, please see the HTML Development section.
Important
BrightSign models are not designed to be used as general-purpose web browsers. Many web pages have elements that will not display correctly on a BrightSign player. Make sure to thoroughly test a web page before using it as digital signage.
Note
HTML video content will play even if it is embedded in an Image zone.
- Site Name: Specify a name for the HTML site. The site name must be unique within the presentation.
- Site Source: Select a source for the HTML site:
- Components: Display an HTML page that is stored on your BSN Content Cloud network. This option is only available if the Storage Selector is set to BSN.cloud Content. If you need to add the page to your BSN.cloud network, go to the Content tab first.
- URL: Display an HTML page from a remote URL.
- Local Site: Include the HTML page with the presentation files. This option is only available if the Storage Selector is set to Local Content. You will be prompted to locate and select the .html file that you wish to display.
Query String (optional): Enter a query string to be appended to the site URL using the following format: "http://www.example.com/over/there?my_query_string".
This section has an accompanying tutorial video:
Tip
The URL and Query string fields accept User Variable values. To specify a User Variable, enter the name of the variable between two sets of braces. The variable value can be either standalone ("{{my_variable}}") or part of a static value ("http://www.brightsign.biz/{{my_variable}}").
Options
Use the following checkboxes to enable optional, advanced features associated with the webpage:
- Enable Node.js: Enables Node.js® for the HTML page.
- Enable BrightSign JavaScript objects: Enables BrightScript-JavaScript objects for the HTML page.
- Enable cross domain policy checks: Enables Chromium security checks for cross-origin requests.
- Ignore https certificate errors: Instructs the state to ignore security errors when connecting to insecure HTTPS hosts. Enabling this feature makes the player insecure; it is not suitable for production environments and should only be used for testing.
- Enable camera: Enables webpage access to USB cameras connected to the player (access is disabled by default). This allows support for WebRTC applications.
- Enable mouse and touch events: Enable user interaction with the HTML page (clicking on links, interacting with JavaScript elements, etc.).
- Display Cursor: Displays a cursor whenever a USB mouse is connected to the player.
- Enable native video playback: Enables HWZ mode on all
<video>elements contained within the page. This increases the frame rate and quality of HTML video playback, but can also cause problems with CSS page transforms and other page elements. By default, it will place video on top of all graphics in the presentation and set the view mode of all<video>elements to Scale to Fill. Enable javascript console: Enables the Chromium Web Inspector for HTML sites in the presentation.
Important
Enabling the Web Inspector creates a security vulnerability on BrightSign players. See this page for more details.
Live Text State
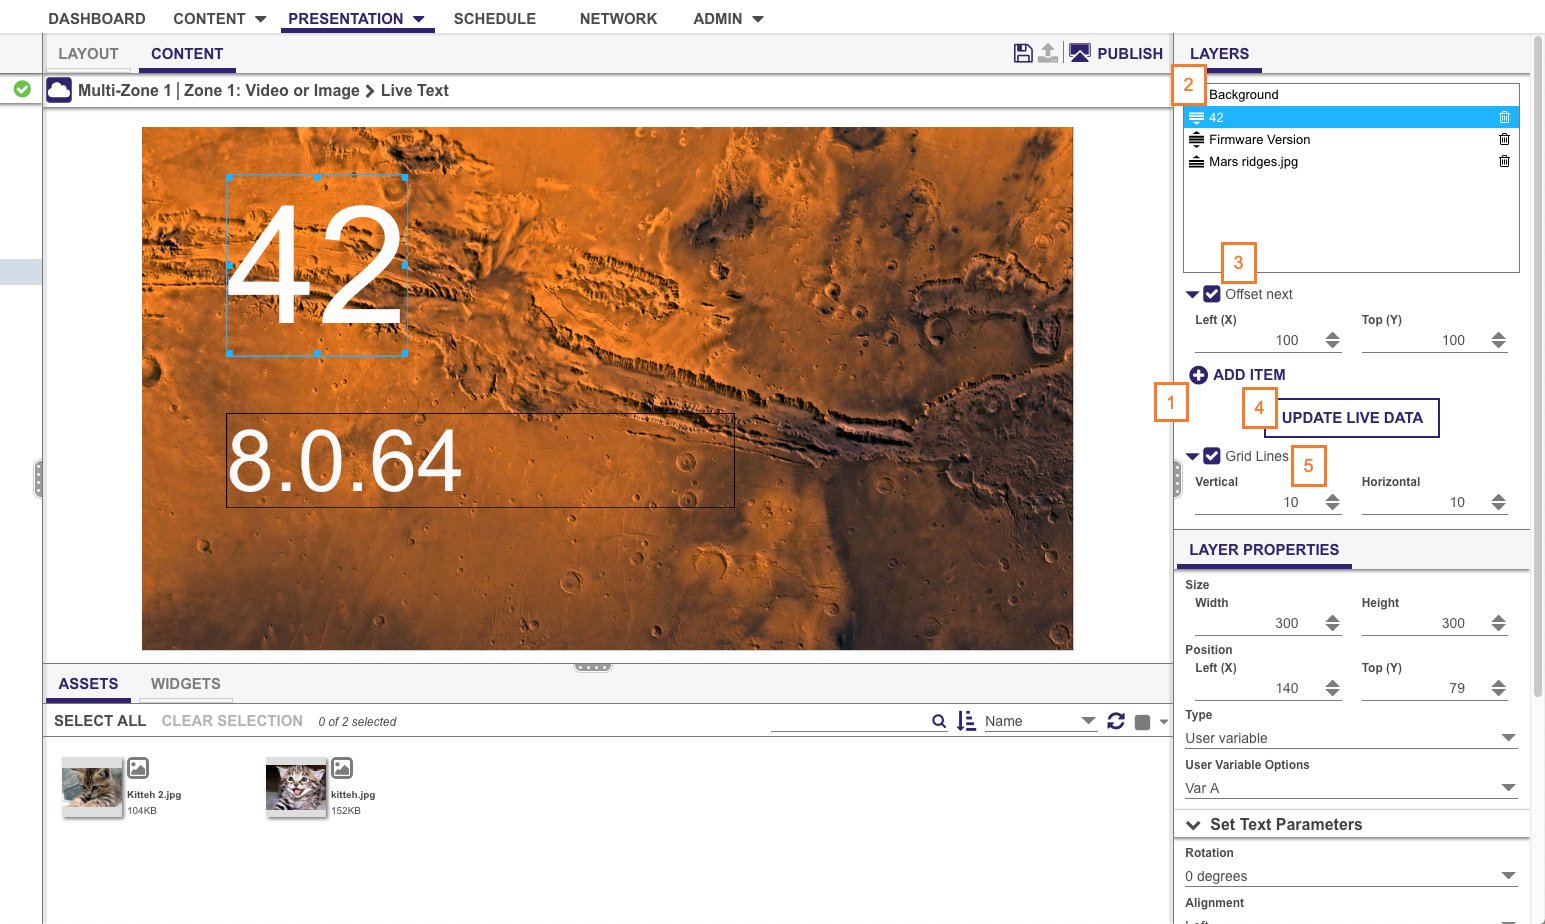
A Live Text state consists of images and text fields overlaid on top of each other. You can layer both static text and updatable RSS and MRSS content with images and customize the position/size of items in relation to the background.
Double click a Live Text widget icon to edit the state.
- Add Item: Click the
 icon to add a new item to the Live Text canvas.
 - Layers: Click and drag a Live Text item to move it up or down the display order. Items that are higher on the list are displayed on top of lower items.
- Background: A permanent layer that is always displayed behind all items in the Live Text state. Use the Layer Properties to set the background to either a color or an image.
- Delete Item: Click the
.png?version=1&modificationDate=1611008597000&cacheVersion=1&api=v2) icon to delete an item from the Live Text canvas.
icon to delete an item from the Live Text canvas.
- Offset next: Check this box to set an initial position for new items in relation to the most recently created item. Input the offset distance for the next text item (in pixels) in the Left (X) and Top (Y) fields.
- Update Live Data: Refresh items that are populated from a remote URL (i.e. Live Text Data, RSS Feed, Media RSS Feed).
- Grid Lines: Check this box to include invisible gridlines on the Live Text canvas. When you manually move or resize elements by clicking and dragging them, they will snap to these lines. Enter the distance between gridlines (in pixels) in the Vertical and Horizontal fields.
Important
To exit the Live Text canvas, click the Zone description located in the top left corner of the canvas. This will take you back to the Zone Content canvas.
Layer Properties
Select an item on the canvas or from the Layers list to edit its properties:
- Size: Adjust the width (W) and the height (H) of the item
- Position: Adjust the position of the item on the horizontal axis (X) and on the vertical axis (Y)
- Type: Use the dropdown menu to select the source of the item:
- Fixed Text: Displays simple, static text. Under Text, enter the text you want to display.
- System Variable: Displays the device serial number, firmware version, script version, or other system value. Use the dropdown list under System Variable Options to determine which system value you would like to display.
- Media Counter: Displays the number of times a media file has played in a presentation. To use this feature, Media Counters must first be enabled in the Presentation Settings > Variables section. Use the dropdown list under Media Options to select a media file that is being used in your presentation.
- User Variable: Displays the current value of a User Variable. You must create a User Variable before using this option. Use the dropdown list under User Variable Options to specify a User Variable in the text field.
- Image: Displays an image. Depending on your Storage Selector setting, you will prompted to select an image file from either your BSN.cloud library or local machine.
- Live Text Data: Displays content from a feed in the text field. The displayed feed item will remain fixed and will not cycle through feed items like an RSS ticker (use the "RSS Feed" type for this functionality). However, you can still update the text in real time by modifying the feed on the server and changing the description associated with the feed item.
- Item title: Specify the feed item to display using the Title/Name of the item.
- Item index: Specify the feed item to display using the index number of the item.
- Validate Live Text Data: Refresh the contents of the item based on the selected item title/index.
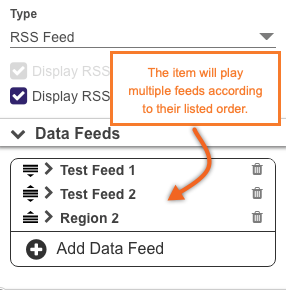
- RSS Feed: Displays content from an RSS Feed.
- Display RSS title: Check this box to display the title of the RSS item.
- Display RSS description: Check this box to display the description of the RSS item.
- MRSS Feed: Displays content from an MRSS Feed.
- Display Media RSS Title: Check this box to display the title of the MRSS item.
- Display Media RSS Description: Check this box to display the description of the MRSS item.
- Display Media RSS Media: Check this box to display the media item associated with the MRSS item.

Data Feeds
Use this section to add Data Feeds to your Live Text Data, RSS Feed, and MRSS Feed items. For RSS Feed and MRSS Feed items, you can add multiple feeds. The item will cycle through the feeds according to their order in the list.
Use the Validate button to check if the feed is accessible and if the format is correct. If your data feed is valid, a green message will appear to let you know that the data feed was accessed successfully. If there are problems with your data feed, you may get the following messages:
- If no data feed URL is specified, you will get an error stating “Data Feed source not properly specified”. If you select Validate at this stage, you will get an error indicating that you must specify a data feed URL.
- If an incorrect data feed URL has been input, you will get an error stating “Unable to access specified data feed. Check the URL or try a new one.”
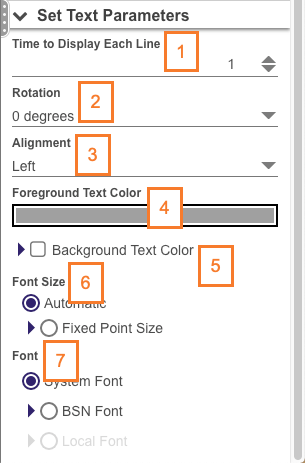
Set Text Parameters
Use this section to edit the appearance of a text item.
- Time to Display Each Line (RSS Feed, MRSS Feed only): Specify how long (in seconds) to display each entry in the feed.
- Rotation: Specify a degree of rotation for the text. This option does not rotate the dimensions of the text box, so you'll likely need to resize it manually.
- Alignment: Specify whether the text is left-aligned, right-aligned, or centered.
- Foreground Text Color: Select a color for the text.
- Background text color: Check this box to include a background color for text fields.
- Font size: Select Automatic to fit the text to the height of the text field, or select Fixed point size to enter a value for the font size (1 - 500).
- Font: Select a font for the text. The System Font option uses the default Linux font. You can use any TrueType font. Click Reset to System Font to reset the font to the default.
Media List State
The Media List state is a convenient tool for defining interactive events with many files in a single feed. By default, each time the playlist transitions to a Media List state, the next file in the list will play and exit the list after a timeout (images) or when the file finishes playing (video and audio). Alternatively, you can set the list to shuffle files or cycle through every file in the list before exiting and transitioning to the next state.
Important
When the Media List state is double-clicked, the Media List canvas will appear. The Media List canvas gives you the option to add content from Assets to the Media List. To exit this canvas, click the Zone description located in the top left corner of the canvas. This will take you back to the Zone Content canvas.
List Content
Use this section to specify how the Media List is populated.
- Populate From Feed: Populate the Media List using a feed. Use the Validate button to check if the feed is accessible and if the format is correct.
- URL: Specify the URL of an RSS feed (this feature does not support MRSS feeds). Upon playing the presentation, the player will retrieve media from the download URLs specified
<description>field of each item in the feed. Each media piece needs have their type specified under<medium>. Supported mediums include image, video, and audio.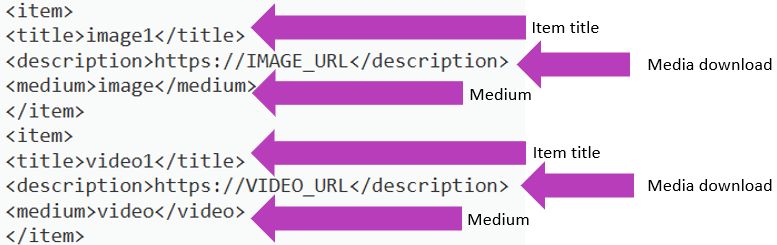
- Dynamic Playlist: Populate the Media List using a Dynamic Playlist from your BSN Content Cloud library.
- Live Media Feed: Populate the Media List using a Live Media Feed from your BSN Content Cloud library.
- URL: Specify the URL of an RSS feed (this feature does not support MRSS feeds). Upon playing the presentation, the player will retrieve media from the download URLs specified
- Update Interval: Specify how often the player should refresh the contents of the feed.
- Parser Plugin: Select a feed parser to parse the feed data before it is passed to the Media List.
- Optimize Feed Updates (use HEAD calls): Check this box to have the player make an HTTP HEAD request before retrieving the contents of a feed. See here for more details.
- Automatically generate User Variables from Data Feed: Use the feed to populate a set of User Variables for HTML pages. See here for more details.
Playback
Use this section to customize the Media List playback.
- Play from start index on entry to state: Check this box to have the Media List begin playing from the specified Start Index each time it is entered. If you leave this box unchecked, subsequent transitions to the Media List will play the next file in the list.
- Start Index : Specify which item in the list should count as the beginning of the list. When non-shuffled playback reaches the end of the list, it will loop back to the top of the list (i.e. start index 0), rather than the specified Start Index .
- Transition: Specify the transition effect for image files:
- Effect: Select an effect that occurs when there is a transition to an image.
- Duration: Specify the duration of the transition effect.
- Shuffle Playback: Check this box to randomize the order of media items in the Media List each time it is entered.
- Send Zone Message (using file name as parameter) prior to showing each item: Check this box to send a Zone Message command every time there is a file transition in the Media List. The Zone Message string will consist of the filename (without the file extension) of the target item in the Media List.
Return to start after inactivity: Returns to the start of the Media state after a specified inactivity time.
Important
BrightAuthor:connected inactivity timeout is counted on a per state basis. Classic BrightAuthor used global inactivity timeout values, and as a result imported .bpf files will lose their previous inactivity timeout value.
Events / Commands
Use this section to define events that will cause a transition to a new item in the Media List. You can also define commands that will be triggered when transitions occur.
- Play Next Events: Select interactive event(s) that allow the user to transition to the next file in the Media List.
- Play Previous Events: Select interactive event(s) that allow the user to transition to the previous file in the Media List.
- Play Next Commands: Select command(s) that will trigger when the Media List transitions to the next file.
- Play Previous Commands: Select command(s) that will trigger when the Media List transitions to the previous file.
On Demand State
The On Demand state allows you to combine media files into a single state in the playlist area. You can then use the event that transitions to the On Demand state to conditionally determine which file in the playlist should be played.
Important
When the On Demand state is double-clicked, the On Demand canvas will appear. The On Demand canvas gives you the option to add content from Assets to the On Demand state. To exit this canvas, click the Zone description located in the top left corner of the canvas. This will take you back to the Zone Content canvas.
The On Demand state can only be transitioned to using input from BP900/BP200, UDP, Serial, Keyboard, or USB devices. The input data from the controller will determine which media item in the On Demand state will be played: For example, you can use a Keyboard Input event to playback “Video 1” if the “A” key is pressed, “Video 2” if the “B” key is pressed, "Video 3" if the "C" key is pressed, etc. Any type of event can transition out of a Play File state and into a new state.
Note
For BP200/BP900 events, you must specify each Key using both the panel enumeration and button number: For example, if you have a single BP200/BP900 panel connected to the player and want button 3 to trigger an image, you would specify the Key as "0-3"; on the other hand, if you have a second BP200/BP900 panel connected to the player and want button 3 on the second panel to trigger the image, you would specify the Key as "1-3".
- Populate From Feed: Populate the On Demand state using a feed. Use the Validate button to check if the feed is accessible and if the format is correct.
- URL: Specify the URL of an RSS feed (this feature does not support MRSS feeds). Upon playing the presentation, the player will retrieve media from the download URLs specified in the
<description>field of each item in the feed. The On Demand state will use the value in the<title>field as the key to determine which media item to play.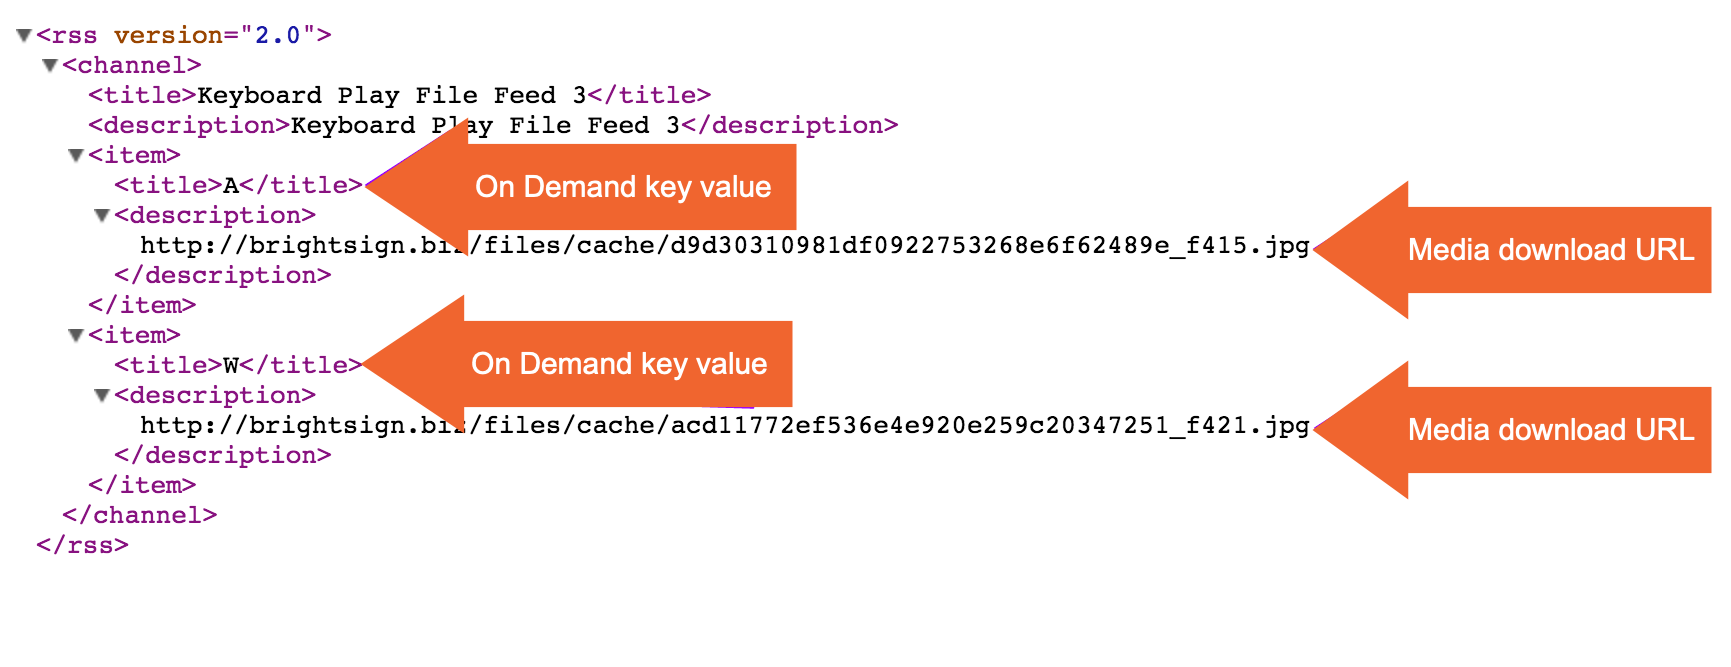
- Dynamic Playlist: Populate the On Demand state using a Dynamic Playlist from your BSN Content Cloud library. The On Demand state will use the filename as the key to determine which media item to play.
- Live Media Feed: Populate the On Demand state using a Live Media Feed from your BSN Content Cloud library. The On Demand state will use the Title of the feed item to determine which media item to play.
- Update Interval: Specify how often the player should refresh the contents of the feed.
- Parser Plugin: Select a feed parser to parse the feed data before it is passed to the On Demand state.
- Optimize Feed Updates (use HEAD calls): Check this box to have the player make an HTTP HEAD request before retrieving the contents of a feed. See here for more details.
- Automatically generate User Variables from Data Feed: Use the feed to populate a set of User Variables for HTML pages. See here for more details.
- URL: Specify the URL of an RSS feed (this feature does not support MRSS feeds). Upon playing the presentation, the player will retrieve media from the download URLs specified in the
- Display default media if input does not match any keys: Check this box to display the specified media file when the input data does not match any existing keys in the On Demand state. If this box is not checked, and the input data does not match an existing key, the presentation will not transition to the On Demand state, remaining on its current state instead.
Use variable to specify key: Check this box to have a User Variable specify the media-file key. The input data from the controller will be ignored, though input of some kind must be received to trigger the interactive event. For example, if a Keyboard event is attached to the On Demand state and this option is enabled, any key press will initialize a transition to the Play File state; the value of the specified User Variable will then be checked against the keys in the On Demand state to determine which file, if any, should be played.
Note
If you attach a command that modifies the User Variable value (e.g. Set Variable, Increment Variable) to an event that transitions to the On Demand state, the media-file keys will still be compared against the old variable value. However, if the Display default media option is enabled, the new User Variable value will be used instead.
Super State
If you create a large, complex interactive playlist, you will likely run into two problems: You’ll find yourself having to create a large number of redundant events, and it will become difficult to keep track of numerous branching states and conditions. Super States are implemented to alleviate these problems and make complex interactive presentations manageable.
Important
When the Super State icon is double-clicked, the Super State canvas will appear. The Super State canvas gives you the option to add media states from Widgets to the Super State. To exit this canvas, click the Zone description located in the top left corner of the canvas. This will take you back to the Zone Content canvas.
The primary mechanic of the Super State is that it functions as both a state and a self-contained interactive playlist. A Super State can be transitioned into and out of using any event, but double-clicking it will reveal a new interactive playlist canvas contained within the original. There are several behaviors that are unique to this state:
- Each Super State contains a Home State: A transition to a Super State will point to the initial state within the Super State by default. However, you can point the transition to any other state within the Super State by opening the event and selecting the desired state from the Specify next state dropdown menu.
- Super States can be nested inside other Super States: You can use the breadcrumb trail above the playlist area to keep track of where you are within the hierarchy of Super States.
- Super States can have Entry and Exit Commands: Entry Commands are triggered when any state within the Super State is transitioned to. If a Super State is contained within one or more other Super States, a transition to or from that Super State will trigger Entry/Exit commands on all other Super States that will need to be moved through for the transition to reach its destination. Commands will be executed in sequential order, depending on whether the transition is ascending or descending through a hierarchy of Super States.
- You can copy and paste, export Super States: All events, states, commands, and other Super States contained within the Super State will be copied over as well.
Video In State
The Video In state allows for live-video playback from another source via the HDMI Input port on the XT1144, XT1143, and 4K1142 models.
Important
Volume can only be changed using the Set Volume command when the presentation is interactive. Video states in a non-interactive state still utilize the Set Volume option in State Properties.
- Overscan enabled: Check this box to display the video input beyond the edges of the zone. Use this option if the source video signal is using an overscan setting.
This section has an accompanying tutorial video:
Live Feed State
The Live Feed state allows you to display media from an MRSS feed (or text from an RSS feed in Ticker zones). An MRSS feed can be hosted on a third-party server or your BSN Content Cloud network (using the Live Media feature). MRSS feeds can be used to play image, video, audio, and HTML content (different content types can be mixed into a single feed).
- Source: Specify the feed source:
- URL: Populate the Live Feed state from a remote URL.
- Live Media Feed: Populate the Live Feed state using a Live Media Feed from your BSN Content Cloud library. Use the Validate button to check if the feed is accessible and if the format is correct.
- Content Usage: Modify other options associated with the feed:
- Update Interval: Specify how often the player should refresh the contents of the feed.
- Parser Plugin: Select a feed parser to parse the feed data before it is passed to the Live Feed state.
- Optimize Feed Updates (use HEAD calls): Check this box to have the player make an HTTP HEAD request before retrieving the contents of a feed. See here for more details.
- Automatically generate User Variables from Data Feed: Use the feed to populate a set of User Variables for HTML pages. See here for more details.
Stream State
The Stream state allows you to play an IP stream from a local or remote source.
- Audio: Play an audio stream.
- Video: Play an audio/video stream.
- MJPEG: Play an MJPEG stream.
- Stream URL: Enter a valid URL for the stream. The URL can also include a number of optional parameters:
- Specify a User Variable to replace all or part of the URL. To include the value of the variable in the URL, enter the variable name between two sets of dollar signs (e.g. "http://www.example.com/streams/$$my_URLvar$$ ").
- Append the "latency" and "jitter" parameters to modify the default latency (see this FAQ for more details).
- Append the "buffersize", "vcdbsize", and "acdbsize" parameters to modify the default streaming buffer size (see this FAQ for more details).
Append the "lowlatency" parameter to reduce the default latency (see this FAQ for more details).
This section has an accompanying tutorial video:
Dynamic Playlist State
The Dynamic Playlist state allows you to display media from a Dynamic Playlist on your BSN Content Cloud network.
- Source: Select a Dynamic Playlist to populate the state.
- Content Usage: Modify other options associated with the Dynamic Playlist.
- Update Interval: Specify how often the player should refresh the contents of the Dynamic Playlist.
- Optimize Feed Updates (use HEAD calls): Check this box to have the player make an HTTP HEAD request before retrieving the contents of the Dynamic Playlist. See here for more details.
- Automatically generate User Variables from Data Feed: Use the feed to populate a set of User Variables for HTML pages. See here for more details.
Event Handler State
In some scenarios, you might want your presentation to sit at a blank screen. The Event Handler fills the role of an empty placeholder in your presentation. Here are a few cases where an Event Handler would be useful:
- You want a blank screen for a Home Screen so no content will play until the presentation is activated.
- You want to add a command that is performed before the first file in the presentation plays.
- You want the presentation to sit at a blank screen when finished, instead of looping.
Although Event Handlers contain no content, you can add commands and interactive events into and out of them. For example, if you set an Event Handler state as the Home Screen and define a BP900 event linked from the Event Handler state to the first presentation item, the display will sit at a blank screen until a user presses the BP900 button, and then the first item will begin playing. Alternatively, if you set an Event Handler as the Home Screen and add a Synchronize command to it, you can synchronize your presentations and/or displays before the first files begin playing.
User Variable State
The User Variable state allows to display text from User Variables in a Ticker zone. Select a User Variable to display from the User Variables dropdown list.