Creating a BrightPlates Presentation
ON THIS PAGE
Follow these steps to create a BrightPlates presentation.
Selecting a Template
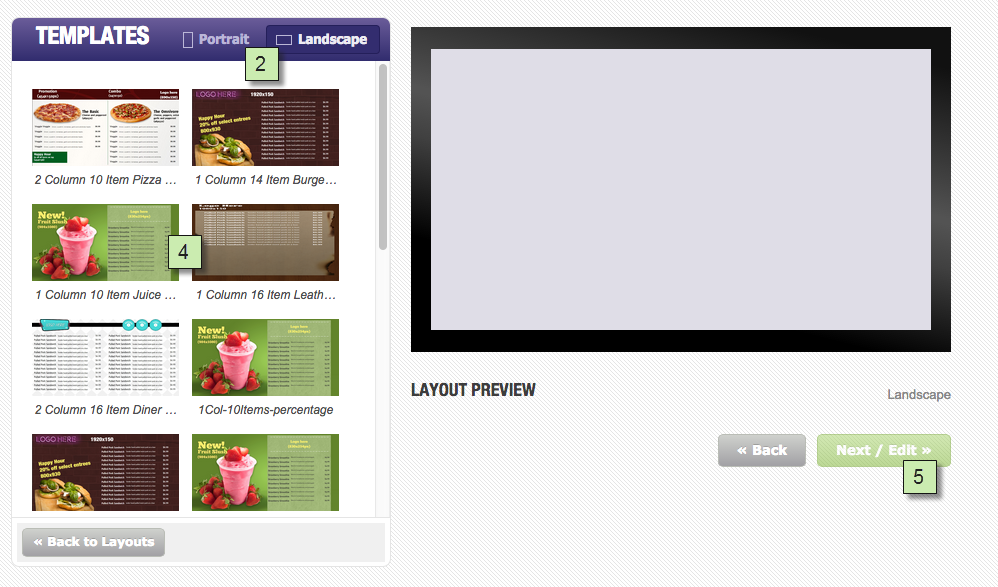
- On the BrightPlates main page, click the Create Presentation button.
- Select the Portrait or Landscape option.
- Select the template type (e.g. Menu Board).
- Click a template thumbnail to see a larger preview.
- Once you've selected the template you wish to use to create your BrightPlates presentation, click the Next / Edit button.
Creating a Presentation
Each BrightPlates template is divided into Images, Live Media Feeds, Text Fields, and the Background Image.
Image Fields
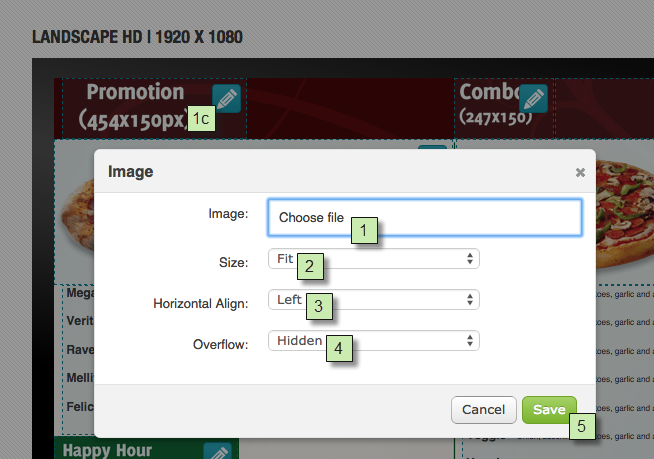
Click an image field to edit it. The Image window will open with the following options:
- Image: Click Choose file to open the File Manager window. Select the image you wish to use.
- If the image you need is not uploaded to your account yet, click Upload file in the lower-right corner of the window. Use the Browse button to locate the image file on your computer, then click Upload to upload it to your account.
- If you have a BSN account, you can use the file directory at the top to navigate among content folders on your account.
- For best results, you should choose an image that is the same width and height as the image field. For system templates, the width and height of the image field is shown in the sample image accompanying the field.
- Size: Select one of the following sizing options for the image:
- Fit: Centers the image without stretching it. If the aspect ratio of the image does not match the aspect ratio of the image field, some of the image field will be left blank.
- Stretch: Alters the width and/or height of image to ensure it fits the image field.
- Stretch width: Alters the width of the image to ensure it fits the width of the image field. The image height is left unaltered.
- Stretch height: Alters the height of the image to ensure it fits the height of the image field. The image width is left unaltered.
- Horizontal Align: This option specifies the image alignment if it the width of the image is smaller than the width of the image field.
- Left: Aligns the image to the left side of the image field.
- Center: Aligns the image to the center of the image field.
- Right: Aligns the image to the right side of the image field.
- Overflow: This option specifies the behavior of the image if its width or height is greater than that of the image field.
- Visible: The height or width overflow of the image will be displayed. Note that this may cause unpredictable interactions with other elements of the template.
- Hidden: The height or width overflow will be hidden, cutting off part of the image.
- Once you are finished configuring the image, click Save to insert the image into the image field.
Live Media Feed Fields
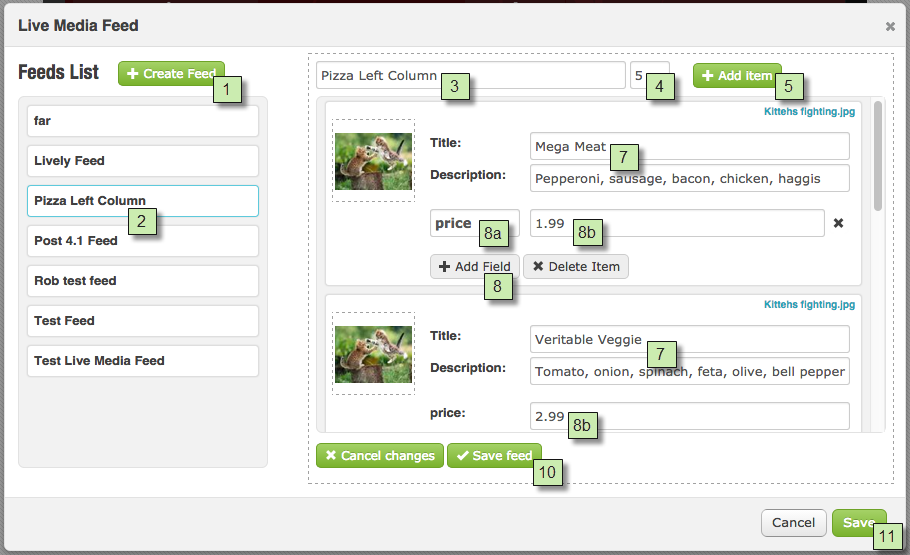
Click a feed list to edit it. The Live Media Feed window will open:
- Click Create Feed to create a new feed (editing the default template text will create a new feed automatically).
- If you already have a feed you wish to use, select it from the list on the left and click Edit.
- Enter a name for the feed.
- Enter a time-to-live (in minutes) for the feed in the TTL field. This determines how frequently the player will check in to see if the feed has changed.
- Click Add Item to add a new item to the feed. The File Manager will open. Select the image you wish to associate with the feed item. If the feed is text only, choose any image as a placeholder.
- If the image you need is not uploaded to your account yet, click Upload file in the lower-right corner of the window. Use the Browse button to locate the image file on your computer, then click Upload to upload it to your account.
- If you have a BSN account, you can use the file directory at the top to navigate among content folders on your account.
- Enter Title and Description text for the item.
- If the template allows for additional text field(s) (such as item price, calorie count, etc.), click the Add Field button. This will add the same custom field for all items in the feed, so you will only need to add a custom field once.
- Enter a key for the text field. This key must match the internal key within the template, or the custom field will not be displayed. To display menu prices, this key must be "price".
- Enter the text that will be displayed in the custom field.
- Click the "x" next to a custom field to delete it. This will remove the custom field from all items in the feed.
- Repeat steps 5-8 for each item you wish to add to the template.
- Once you are finished editing the feed, click Save feed or Save feed as….
- Click Save to replace the default template text with your Live Media Feed.
Text Fields
Click a text field to open the Edit Block Text window. Edit the text and click Save. You can also use the options in the tool bar to modify the formatting and layout of the text.
Background Image
Click Change background image to set the background to an image, video, or color.
- Select whether the background should be an Image or Video.
- Click Choose file to select the new background image/video:
- If the file you need is not uploaded to your account yet, click Upload file in the lower-right corner of the window. Use the Browse button to locate the image file on your computer, then click Upload to upload it to your account.
- If you have a BSN account, you can use the file directory at the top to navigate among content folders on your account.
- If you are adding a video, specify the following:
- View Mode: This option specifies how the video will be treated if it doesn't fit the display exactly.
- Scale to fit: Scales the video to fill the screen without maintaining the aspect ratio. The video may appear stretched.
- Letterboxed and centered: Centers the video and adds black borders on the top and bottom. The aspect ratio is maintained.
- Fill screen and centered: Centers the video and fills the screen. The aspect ratio is maintained, so the video may be cropped if required.
- Audio output: Enables or disables the Analog, HDMI®, and SPDIF audio outputs for the zone.
- Pass through: Supplies the un-decoded audio signal through the HDMI/SPDIF connector. Use this option if the zone audio (for example, AC3 Dolby Digital) is being decoded on an external device.
- Stereo: Supplies the decoded audio signal through the HDMI/SPDIF connector.
- View Mode: This option specifies how the video will be treated if it doesn't fit the display exactly.
- Audio mixing: Sends the stereo, left-only, or right-only audio signal.
- Initial volume (Video): Sets the initial volume for video files (0-100).
- Initial volume (Audio): Sets the initial volume for audio files (0-100).
- Click Save to update the background image or video.
Saving and Publishing the Presentation
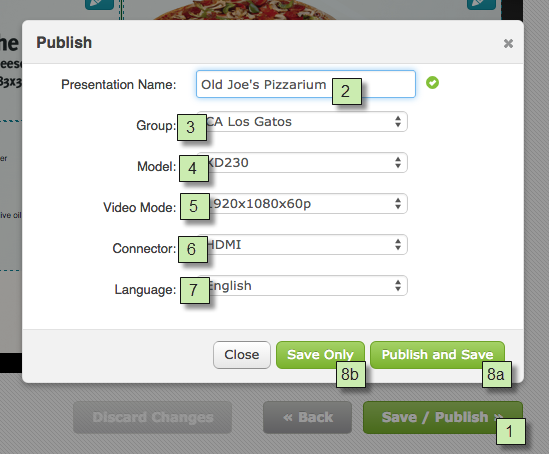
- When you are finished editing the BrightPlates presentation, click Save / Publish. This will open the Publish window.
- Enter a Presentation Name. This name must be unique within your BrightPlates account.
- Specify which Player( or BSN Group) you wish to publish the presentation to.
- Select the target player Model for the presentation.
Select a Video Mode that is supported by the monitor(s).
Important
All system templates are intended for use with 1080p monitors. Selecting a video mode other than 1920x1080 may lead to scaling issues with system templates.
- Select the Connector type that will be used by the players(s).
- Specify the Language for date and time formatting.
- Complete the BrightPlates creation process:
- Click Publish and Save if you want the presentation to be saved in your BrightPlates account and published to the specified Player or Group.
- Click SaveOnly to save the BrightPlates presentation without publishing it.
Note
If you have already published the BrightPlates presentation to a player or group, you do not need to select Publish and Save again. Instead, choose Save Only, and the player(s) will update its content the next time it checks in.


.png?version=1&modificationDate=1459465064000&cacheVersion=1&api=v2&width=320&height=240)
